Aloo Paratha (Indian Potato Pancakes)

>> Saturday, December 23, 2017


Aloo Paratha (Indian Potato Pancakes)


Hey, did you know "aloo" means potato? One of my favorite foods, for sure.

Aloo parathas are delicious anytime. While some people eat them for breakfast, they're also great to wrap up fillings like cucumber-yogurt salad, eggs, chutneys, lentils, beans, or anything your imagination suggests. The most difficult part, if there is a difficult part to this simple recipe, is rolling out each cake. Be gentle and sprinkle your surfaces with flour as you need it.

Aloo Paratha (Indian Potato Pancakes)


Though my Indian-American friend Sheilja has made these before, she called her mom in New Jersey to get a specific recipe before we cooked together this week. Sheilja says her mom can toast these cakes on three or more griddles at once without losing her head or getting flustered.

Ingredients

6 cups potatoes, boiled and finely shredded
1 2-inch piece fresh ginger, peeled and grated
2 tsp red chili powder
4 tsp cumin powder
2 tbsp fresh lemon juice
1 tbsp salt (or more, to taste)
About 3/4 cup flour (we used whole wheat flour), plus more for rolling
2 tbsp vegetable oil, plus more for cooking (about 1/4 cup total)

Directions

Stir together all ingredients. Form the potato mixture into balls the size of a golf ball - about 2" in diameter. Coat each of the balls in flour and let rest for 5 minutes.

Aloo Paratha (Indian Potato Pancakes)


Gently roll out each ball on a floured surface, until it is about 1/4 inch thick and 4 or 5 inches in diameter. Place on waxed paper while rolling the rest.

Heat a flat skillet on high until a drop of water sizzles off it immediately. Place one or two parathas on the skillet, making sure they don't touch while browning. Swirl a drop of oil on the top of each pancake, then flip it when the first side is browned. Put a bit of oil on that side as the uncooked side browns and begins to bubble a bit.

Serve warm with any variety of chutneys, vegetables, yogurt, or the delicious raita - a cucumber-yogurt-mint sauce.

Makes about 30 pancakes.

Read more...

Seafood-Stuffed Portobello Caps

>> Saturday, December 16, 2017


Seafood-Stuffed Portobello Caps


I'm torn between presenting this stuffed mushroom recipe as an appetizer or a meal. If you want to use baby portobellos (crimini mushrooms) or white button mushrooms instead, these make a tasty bite-sized appetizer. We stuffed them with white fish and shrimp, but if those are not your favorites, stuff them with any seafood combo you like.


Shrimp stuffed mushrooms


Ingredients

2 tbsp oil
1/2 cup chopped white onion
1/3 cup chopped celery
1/2 small jalapeno, seeded and minced
4 oz. any kind of white fish, chopped
3 oz. shrimp, cleaned, tails removed, and chopped
2 tsp Old Bay seasoning
1 tbsp butter, melted
1 cup white bread crumbs
3 tbsp grated Parmesan cheese
8 large portobello mushrooms, or 1 pound white mushrooms
3 oz. sharp cheddar cheese, shredded

Optional
1/4 cup mayonnaise
1 1/2 tsp wasabi paste or powder

Instructions

Remove the stems from the mushrooms and finely chop them. Grease a baking sheet and set the mushroom caps on the sheet. Preheat the oven to 350 degrees.

Heat the oil in a medium skillet. Add the mushroom stems, onion, celery, and jalapeno, and saute until tender. Add the chopped fish, shrimp, and Old Bay spices and cook until just opaque. Try not to over-cook the shrimp, because they'll get rubbery.

In a bowl, stir together the butter, bread crumbs, and Parmesan cheese. Add the seafood mixture and stir well. Fill each mushroom cap with the fish stuffing and top with the shredded cheese. Bake at 350 degrees 20-30 minutes, until the mushrooms are tender and the filling is bubbly and toasted on top.

If you want, whisk together the mayonnaise and wasabi. Just before serving, drizzle the wasabi mayo over the hot mushrooms. Serve the mushrooms piping-hot.

Serves 4 as a main meal; serves 6-10 as an appetizer.

Read more...

Olive-Stuffed Italian Bread

>> Monday, December 4, 2017


My siblings share with me a special love for olives - something that has become a bit of a joke at holidays. We would not dream of a holiday celebration or family party that didn't include a big bowl of olives.

If you make extra chopped olives and don't stuff it in the bread, you can use it as a tapenade for our recipe Crispy Polenta Wedges with Olive Tapenade - or if you end up with extra tapenade after making that recipe, by all means stuff it in your next loaf of homemade Italian bread!

Ingredients

2 cups warm water (110-112 degrees)
1 (.25 ounce) package active dry yeast or 2 1/2 teaspoons active dry yeast from a jar
1 tsp sugar
5 cups white flour, plus 1/2 cup or more for kneading
2 tsp fresh chopped oregano, or 1 tsp dried
2 tsp salt
1 1/2 cups mixed olives, pitted and chopped (we used green ones with pimientos, Kalamata olives, and oil-cured Italian olives)
1/4 cup grated parmesan cheese
1 egg white
1/4 cup sesame seeds

Directions

In a mixing bowl, stir together the warm water, yeast, and sugar. Let sit for 20-30 minutes, until the mixture is bubbly (this is called "proofing the yeast"). Stir together the flour, oregano, and salt, then gradually stir into the yeast mixture.

Turn the dough out onto a floured counter or kneading board. Knead the dough for about 10 minutes, or until the dough is smooth and elastic and no longer sticky.

Grease a bowl that is at least twice as large as the volume of dough. Place the dough in the greased bowl, and then turn it over to coat the other side of the dough. Cover with a damp dishtowel. Let rise in a warm place until doubled in size, about 1 to 1 1/2 hours.

Stir together the chopped olives and parmesan cheese and set aside.

Punch down the dough and divide it in half. Sprinkle a flat surface and a rolling pin with flour. Roll out half of the dough into an 8x12 oval. Sprinkle half of the olive mixture evenly over the surface. Starting at one of the long ends, roll up the dough jelly-roll style, tucking in the sides occasionally, and pinching the end shut. Place it in a greased baking sheet. Repeat with the other loaf.

Cover the loaves with a damp dish towel and allow to rise until dough has doubled - about 45 minutes. Preheat the oven to 400 degrees.

Cut diagonal slashes in the top of each loaf, then brush with the egg white and sprinkle with sesame seeds. Bake for 40-45 minutes, until the crust is golden and the loaves sound hollow when rapped with a knuckle.

Turn out of the pans and cool on a baking rack. For best results, slice it at room temperature.

Makes 2 hearty loaves.

Read more...

Hanoi-Style Pork and Chicken Vermicelli Soup (Bún Chả Hà Nội)

>> Saturday, November 25, 2017


Hanoi-Style Pork and Chicken Vermicelli Soup (Bún Chả Hà Nội)

Ah, our jobs keep us too busy to travel in the near future. Instead, Joe and I whipped up a savory bowl of this traditional soup from Hanoi. According to Vietnamese chef Eric Nguyen, this is popular street food in found only in that northern city. People eat it for breakfast, lunch, and dinner.


We simplified his original recipe in the cookbook My Vietnam by using chili-garlic paste instead of a bird's eye chili, and instead of pork terrine, we added tofu that we needed to use up. This was fresh-tasting and satisfying, and the leftovers were just as good.

Ingredients

8 cups hot chicken broth
2 tsp sugar
1/4 cup fish sauce
2 cloves garlic, minced
2 tbsp chili-garlic paste
2 tsp salt
3 oz boneless, skinless chicken breast, cubed
3 oz pork fillet, cut into matchstick slices
4 oz firm tofu, cubed
9 oz dried rice vermicelli noodles
2 eggs
2 tbsp vegetable oil
2 tbsp green onions, cut into matchstick slices
1/2 cup cilantro leaves
1/2 cup mint leaves
1 cup mung bean sprouts
Shrimp paste, to taste

Directions

In a large pot, stir together the chicken broth, sugar, fish sauce, garlic, chili-garlic paste, and salt. Bring to a boil, then drop in the chicken, tofu, and pork. Reduce heat, cover, and simmer for 20 minutes. Remove the meat and tofu to a bowl and keep it warm; keep the broth simmering until ready to serve.


Cook the vermicelli according to package directions, until it is barely tender. Rinse in cold water and allow it to drain, stirring to prevent it from sticking. Add a little oil if the noodles start to clump - rice noodles can be very sticky.

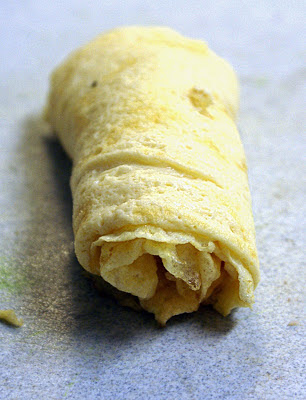
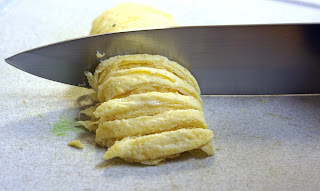
Slightly beat the eggs. Place a large non-stick frying pan on the stove and warm the oil. Pour about 1/4 of the egg into the pan in a thin layer. Cook for one minute, until just set, then flip it over and cook the other side. The egg should be very tender. Slide the egg off onto a cutting board. Repeat with the rest of the egg mixture, stacking the egg "pancakes" on the cutting board. Then roll the egg stack into a cylinder and cut it into thin slices.

a roll of egg "pancakes"


Cutting egg rolls


Ladle the broth into each person's bowl. At the table, let each guest add vermicelli, then the meats, then the egg strips. If desired, stir a little shrimp paste into the bowl. Top with green onions, mint, and bean sprouts, and provide extra fish sauce for dipping. Store leftovers separately so that the tofu and rice vermicelli don't get gummy by soaking in the broth.

Serves 4-6.

Read more...

Curried Pumpkin Hummus

>> Sunday, November 12, 2017


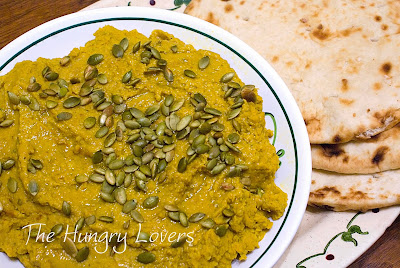
Curried Pumpkin Hummus


As well as pumpkin, you can also use any kind of winter squash in this recipe. Those slightly sweet fall squashes pair naturally with Indian spices like curry powder, ginger, and coconut milk. If you use a squash like butternut or acorn, just quarter it, scoop out the seeds, and microwave the pieces for 15-18 minutes, until it's tender. Let it cool a bit before measuring out 2 cups of squash into the food processor.

bowl of fall squashes


Serve this hot with naan and cucumber-yogurt raita sauce, and you have a healthy Meatless Monday meal. Skip the yogurt, and it's vegan, too!

P.S. The toasted pumpkin seeds in this recipe are shelled; we buy them from the grocery store that way. I've never shelled my own but I don't think I'd want to. Sometimes you can find these in ethnic aisles of grocery stores, labeled as "pepitas".

Ingredients

1 15 oz. can garbanzo beans, drained
1 15 oz can pumpkin
2 tbsp sweet curry powder
1 tsp garlic powder
1/4 cup roasted pumpkin seeds (pepitas)
1 teaspoon fresh grated ginger
1 Thai chili pepper, seeded and minced
1 tsp salt
1/3 cup light coconut milk
1 1/2 tsp sesame oil

Directions

Toast the pumpkin seeds in a dry frying pan until slightly browned and fragrant.

Place all ingredients in a blender or food processor, and process on high until smooth and creamy. If you like a little texture to your hummus, reserve 1/4 cup garbanzos, add them towards the end of the processing time, and blend them until the mixture is just a little chunky.

Put the hummus in a saucepan and heat until steaming hot, stirring frequently, about 5 minutes. Pour into a bowl and top with extra roasted pumpkin seeds, if desired, and serve with naan, pita bread or wedges, or crackers.

Makes about 4 cups of hummus.

Read more...

Ricotta and Chard Gnocchi

>> Sunday, November 5, 2017


Ricotta and Chard Gnocchi
Angela loves this simple gnocchi soup - ricotta and chard gnocchi in chicken broth.


We were lucky enough to take cooking classes in Italy with people who shared authentic recipes passed down through generations in theif family. One recipe was this ricotta and chard version of gnocchi - a little different than the tender flour or potato dumplings we've had before.

These delicately-flavored dumplings are fairly easy to make and freeze well. You can serve them with melted butter and Parmesan cheese, a meat or tomato sauce, or cooked in chicken broth, which is Angela’s favorite.

A few years ago, we grew multi-colored chard with yellow, white, orange, and red stems and our vegetable garden was gorgeous to look at. We were surprised to see how many re-seeded for the next couple of years. Spinach, kale, or arugula is a good substitute for chard. If you use frozen, make sure you drain it well before using.

Ingredients

1 lb. Chard, spinach, or arugula, rinsed, and stems removed
1 ½ cups low-fat ricotta
2 beaten eggs
1 cup grated parmesan cheese
1 tsp black truffle salt
1/8 tsp. Ground Nutmeg
1/2 tsp ground pepper
2 cups flour
1 tsp. Extra-virgin olive oil
2 quarts broth, meat gravy, or marinara sauce

Instructions

Finely chop the greens. Add ricotta, eggs, parmesan, nutmeg, salt and pepper, and combine the ingredients.

Spread flour on work surface and dust your hands with flour. Take about 1 tablespoon of the mixture and roll it into a ball with your hands. Continue rolling, dusting your hands and the work surface frequently, until all the mixture is used.

Pour the oil into a large frying pan and lightly brown the gnocchi balls, stirring frequently but gently. In another pot, bring the sauce or broth to a boil, reduce heat, and add all the gnocchi. Cook for 3-5 minutes, making sure the gnudi do not stick to each other.

You can serve this with additional Parmesan cheese if you like. We never seem to get enough of that cheese!

Serves 6.

Note: if you are going to freeze the gnocchi, cook them in boiling salted water 3-5 minutes, drain and let cool, and then place in labeled freezer bags.

Read more...

Pot Roast Paprikash and Hungarian Pilaf

>> Sunday, October 29, 2017


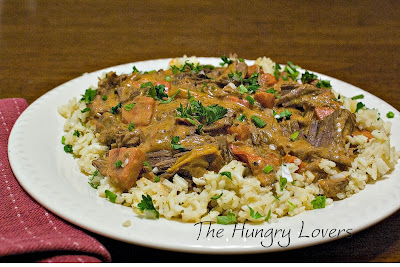
Pot Roast Paprikash and Hungarian Pilaf


Joe whipped up some Hungarian-style rice pilaf to go along with this. Though we cooked this in the oven, it would work well in a slow cooker, too. When you get home from work, the house will smell amazing, and the rice takes less than 30 minutes to make. It's a Sunday dinner kind of dish for a weekday timetable!


Ingredients

2 pounds beef rump roast
2 tablespoons sweet paprika
14 1/2-ounce can diced tomatoes
14 1/2-ounce can beef broth
2 cups yellow onions, halved and cut into 1/2-inch slices
3 large carrots, peeled and cut into 1/2-inch coins
1 cup red bell pepper, cored and cut into 1/2-inch strips
1/4 cup water
2 tablespoons cornstarch
8 ounce carton low-fat sour cream
Salt and pepper to taste

For the Rice

1 cup long grain rice
2 cups vegetable stock
1/2 cup onions, chopped
2 cloves of garlic, minced 
1 tsp vegetable oil
1 tbsp flat-leaf parsley, chopped
Salt and pepper to taste
1/2 tsp sweet paprika


Directions

Trim the fat off the meat and cut it into quarters.

If using a slow cooker, place the meat in the cooker and sprinkle with the paprika. Top with tomatoes, broth, onions, carrots, and sweet peppers. Cook for 10 hours on low heat or 4-6 hours on high heat.

If using the oven, preheat it to 350 degrees. Brown the meat on all sides, then sprinkle with the paprika. Add the  tomatoes, broth, onions, carrots, and sweet peppers. Bring to a boil, then cover, and place in the middle rack of the oven. Cook at 350 degrees for 2 hours, stirring occasionally.

To make the rice, heat the oil in a saucepan, then add the rice and stir until it turns white and slightly toasted. Add onions and garlic and saute until tender. Add the stock, parsley, salt, pepper, and paprika. Bring to a boil, then reduce heat and simmer, covered, 20 minutes or until the rice is tender and the liquid is evaporated.

When the meat is tender and flaky, put it on a cutting board and shred it with two forks. Skim any fat from the sauce, put the meat and sauce into a saucepan. Whisk together the water and cornstarch, then bring it to a boil and cook 15 minutes, until thickened. Stir in the sour cream and heat on low for 5 minutes. Add salt and pepper to taste, then serve over the rice.

Serves 4-6.

Read more...

Szechwan Hot and Sour Soup

>> Tuesday, October 17, 2017


Szechwan Hot and Sour Soup


Joe's test of a good Asian restaurant is the quality of their Sichuan hot and sour soup, so I gave him a kitchen challenge: impress me with your version of hot and sour soup. Oh, and I've been craving Thai shrimp spring rolls, can you do anything to help?

He exceeded my expectations.

I hear that this soup is one of those concoctions that can cure a cold, or just make you feel a whole lot better while you're eating it. Maybe we should start a new category for medicinal recipes.

Ingredients

1/3 lb pork
1 tbsp dried wood ear mushrooms
2 tsp salt
1/2 cup shiitake mushrooms
1/4 cup bamboo shoots
1 small carrot
3 oz. tofu
1 green onion
2 tsp grated ginger
2 tbsp (30ml) Sichuan preserved vegetables, or 2 tbsp chili-garlic paste
5 cups pork broth
2 1/2 tbsp cornstarch
2 tbsp rice wine vinegar
1 tbsp soy sauce
2 eggs


Garnish:
Red pepper flakes
Sesame oil
1/4 cup chopped cilantro
1/4 cup sliced green onions

Instructions

Place the pork, salt, and woodear mushrooms into a pot and cover with water. Bring to a boil, reduce heat, and simmer until cooked, about 30 minutes. Reserve the cooking liquid, adding more if necessary to make the 5 cups of broth you'll need at the end.

Cut the pork, mushrooms, bamboo shoots, tofu, scallion, carrot, and Sichuan preserved vegetables into matchstick slices. Add to the broth and bring to a boil. Reduce to a simmer.

Whisk together the cornstarch, soy sauce, and vinegar, then slowly stir into the broth. Whisk the eggs.
Pour them in a thin stream into the soup while stirring the broth, so that it forms flaky threads as it swirls into the soup.

Serve in single bowls with the garnishes on the side for the diners to add as they choose.

Serves 4-6.

Read more...

Sausage & Apple Skewers with Honey-Mustard Glaze

>> Wednesday, October 11, 2017


Sausage & Apple Skewers with Honey-Mustard Glaze


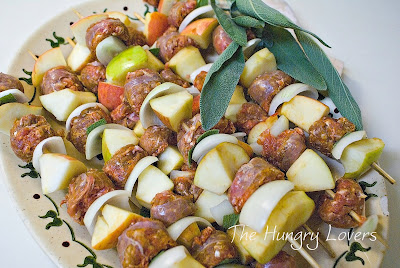
A few days later, one of my friends gave me an enormous bouquet of sage and kale from her garden. I fried up some of the sage, Italian-fashion, but saved some for these luscious fall-flavored sausage skewers. We used firm honeycrisp apples, as they hold their shape well when cooking, along with curls of white onion and slices of those fresh sage leaves. A super-easy honey-mustard sauce goes over the top - so delicious.

Ingredients

10-12 wooden skewers

1 pound mild Italian Sausage, cut into 1-inch pieces
1 pound hot Italian Sausage, cut into 1-inch pieces
2 cups firm tart apples, like Honeycrisp, Granny Smith, or Jonathan, cored and cut into 1-inch cubes
1 cup onion, cut into quarters, then separated into leaves or curls
5 large sage leaves, torn into small pieces
1/2 cup honey
1/3 cup stone ground mustard
3 tbsp apple cider viegar
2 tsp garlic powder

Directions

Soak the wooden skewers for about 15 minutes, to prevent burning. Preheat the oven to 400 degrees, or the grill to medium heat.

Thread the sausage, apple chunks, onion, and sage pieces onto the skewers. Whisk together the honey, mustard, vinegar, and garlic powder, then drizzle half over the skewers.

If roasting in the oven, place the skewers on a baking sheet and cook for 15 minutes. Flip them over, drizzle with the remaining glaze, then roast until the sausage is fully cooked, about 15 to 20 minutes more.

If grilling the skewers, place directly on the grill and cook them, turning frequently, for about 30 minutes, basting them with the honey-mustard glaze occasionally.

Serves 4.

Read more...

Broiled Tomatoes, Arrabiata-Style

>> Sunday, October 1, 2017


Broiled Tomatoes, Arriabiata-Style


According to people who probably know what they're talking about, arrabiata means something like "angry"; cooking something arrabiata-style ("all'arabiata") means it's in a fiery tomato sauce. This pepper-laced topping on luscious summer tomatoes is inspired by spicy red arrabiata sauce. If you're talented at cupping the breading over tops of the tomatoes so it sticks, this entire dish will take about 3 minutes to prepare, and 30-40 minutes of hands-off cooking time.

That's enough time to take a bubble bath with a glass of wine before dinner. Just sayin'.

Ingredients

8 medium ripe tomatoes
1 1/2 cups bread crumbs
2 tbsp olive oil
1 1/2 tsp cayenne pepper (to taste)
2 tsp capers, chopped
1 tsp basil, chopped
1 tsp parsley, chopped
2 tbsp Asiago cheese, grated
6 Kalamata olives, pitted and sliced


Directions

Preheat the oven to 350 degrees. Oil a baking pan.

Wash the tomatoes and cut the core out of the top of each one. If desired, slice a little off the bottom of each tomato so it will sit steady on the pan. Place the tomatoes an equal distance apart on the baking sheet.

Stir together all ingredients except the olives, and spoon onto the tops of the tomatoes, pressing the topping down so it stays in place. Top with the sliced olives.

Bake for 30-40 minutes, until the tomatoes are soft and fully cooked. Turn on the broiler to 500 degrees and set the pan under the broiler 4 inches from the heat. Broil for 3-5 minutes, until the tops are golden brown.

Serves 4-8.

Read more...

Seared Ahi Tuna with Wasabi Pea Crust

>> Friday, September 22, 2017


Seared Ahi Tuna with Wasabi Pea Crust


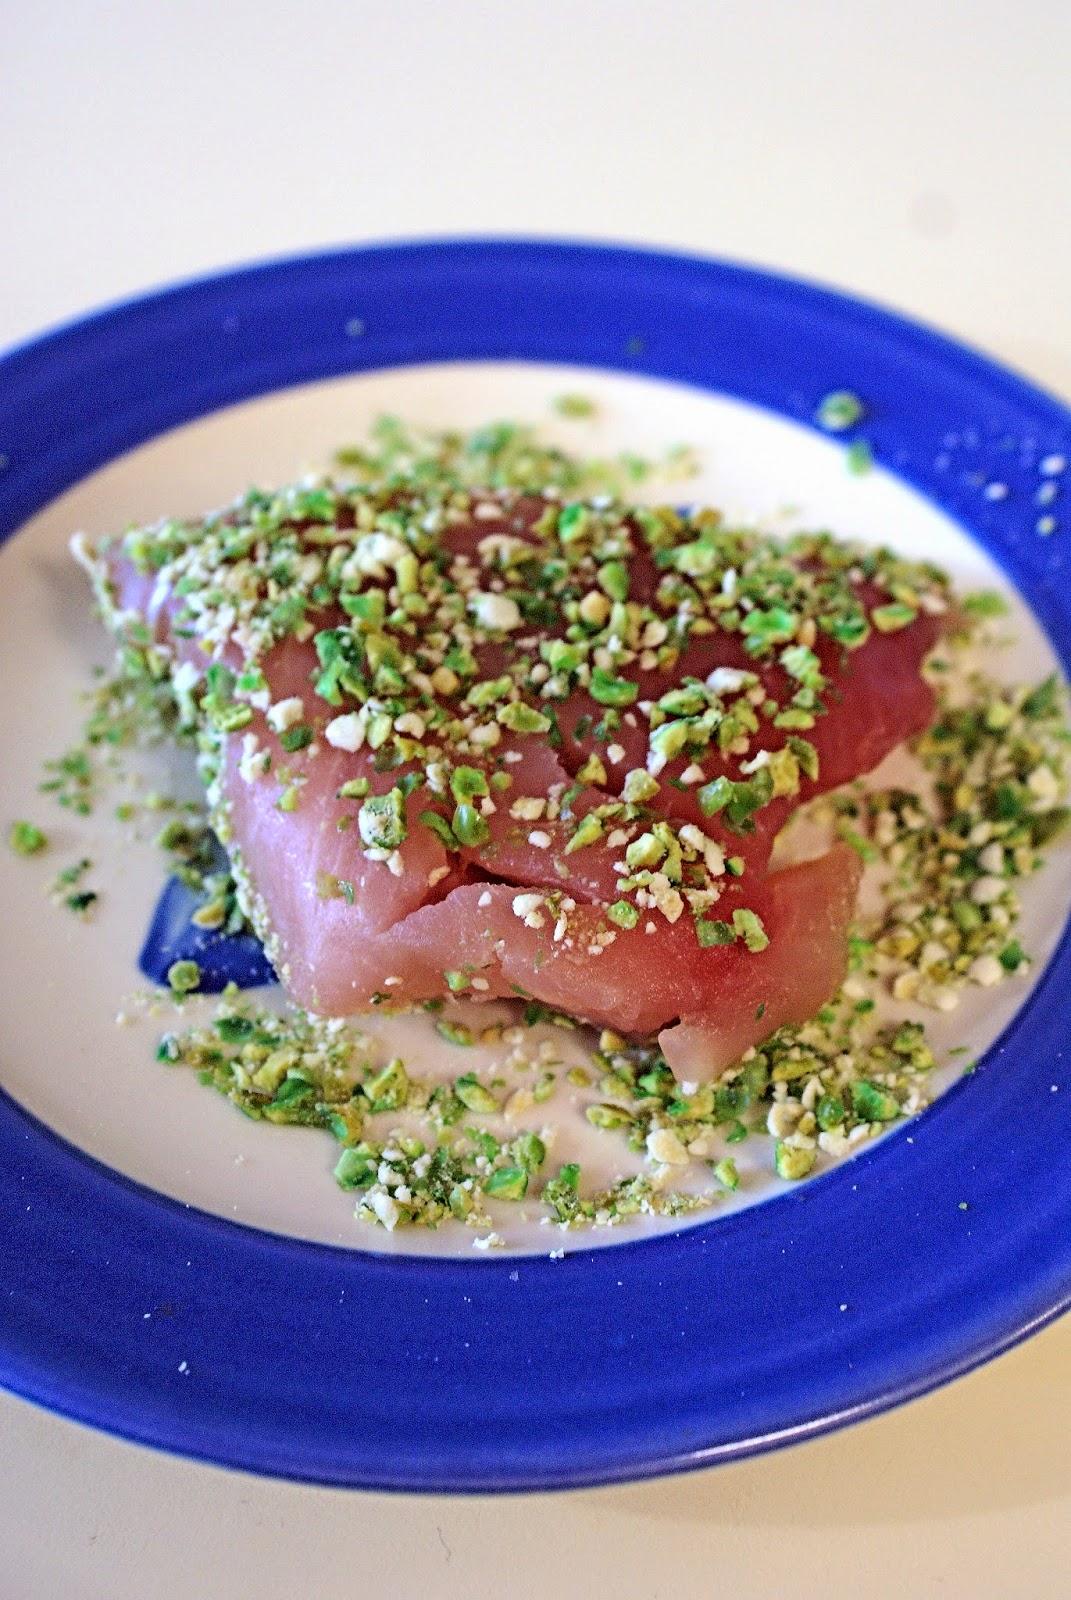
The week before Valentine's Day, I started developing a menu that would surprise Joe, stretch my cooking repertoire, be as healthy as possible, and use up a lot of items in our pantry and freezer as part of our yearly spring cleaning. I made seven courses in the classic French tradition, where the salad is served after the main course. The fish course featured these seared tuna steaks with a crunchy wasabi-pea crust.
Seared Ahi Tuna with Wasabi Pea Crust


We have made this several times since then. Ahi is a low -fat, high-protein meat, and flash-frozen fish fillets tasted just as good in this recipe as high-priced fresh ahi tuna. This is also extremely quick to make, so be sure everything's ready to go before you start cooking.


Ingredients

For the tuna
3 3-4 oz. ahi tuna steaks
2/3 cup wasabi peas - you can often find these in the snack section of an Asian aisle
1 tbsp canola oil

For wasabi-ginger sauce
1 clove garlic, minced
1 tbsp finely grated fresh ginger (about 1 inch)
1/2 tsp red pepper flakes (more or less to taste)
1 1/2 tsp wasabi paste (or wasabi powder mixed with 1/4 tsp water)
1/4 cup rice wine vinegar
3 tbsp soy sauce
2 tsp sesame oil
1 tbsp light molasses (or light brown sugar mixed with 1 tsp water)

Instructions

Let tuna fillets dry on paper towels - the more moisture you absorb, the easier it will be to sear them without moisture seeping out and poaching them instead. This will also ensure they don't soak up much oil.

Put all the sauce ingredients in a blender or food processor and pulse until smooth. Keep at room temperature until ready to serve.

Crush the wasabi peas in a blender, or coffee grinder. You can also put them in a plastic bag and crush them by rolling a rolling pin over them. When you're done, they should be the texture of coarse crumbs. Spread the peas onto a plate.

Heat a wide skillet on medium-high, then add the oil. Press the tuna fillets into the wasabi peas until coated on both sides. When the oil shimmers, place the fish in the pan and make sure they aren't touching each other.

Cook until there's a good sear on one side, then flip over and sear the other side for a minute or so.  You want the sear to be about a millimeter deep, and the center rare at room temperature

That's it! We like to serve them by slicing them across the grain, sort of like a slice of sashimi at a fancy restaurant. This shows the gorgeous contrast between that pretty ruby flesh and the bright green pea crust. 

Serves 4.

Read more...

Quick Italian Eggplant Towers

>> Tuesday, September 12, 2017

Italian Eggplant Towers


Have I mentioned before that my parents raise an enormous garden every year? Even more cool, they grow things like eggplant, which look pretty odd as they come up, and which I'm sure I never ate growing up and even more sure my parents never tasted as kids. Did you grow up with eggplant? Even the word is a little odd, and ick-inducing, isn't it? I think I prefer names like aubergines (French) or melanzane (Italian).

This super-quick recipe from my mom is impressive if you have the skills to make it look like a spirally tower (look at how pretty Joe made it look!). This is a go-to recipe if you've got about 20 minutes to make dinner and you really need to eat something healthy.

If you're one of the fortunate ones that can splurge on something higher calorie, I highly recommend using one of those shredded cheese blends with mozzarella, asiago, and other good things. You could also add cooked and crumbled Italian sausage...actually, I can think of about 10 other things that would be awesome in this dish.

If you do have a bit more time, you can simmer up your own marinara sauce with a couple of cans of crushed tomatoes and your favorite Italian herbs and spices. This weekend we were a bit rushed for time, between errands and that Honey-Do list and all...but we did whip up some of our own sauce. Next time we'll make a double recipe of sauce so we have some frozen on hand when we're really busy.

homemade marinara sauce


Ingredients

2 medium eggplants
1 jar spaghetti sauce or homemade marinara
1 small jar of roasted red peppers, drained
2 cups fat-free shredded mozzarella

Instructions

Preheat the oven to 400 degrees and spray a baking sheet. Put the sauce in the microwave and heat until bubbly.

While it's heating, slice up the eggplant into 1/2" disks. We prefer to peel ours because we don't like the texture of the cooked skins. Place on a plate, cover with plastic wrap, and microwave until it's tender, about 3-4 minutes.

Place the pepper into the microwave and heat up for about 1 1/2 minutes. While it's heating, place a layer of eggplant onto the greased pan. Sprinkle with 1/4 of the cheese, then drizzle some of the sauce over the layer. Add a second layer, then top it with the red pepper. Add a third and fourth layer. 

Cover with foil and place in the oven. Cook for 10 minutes, then remove the foil and cook for 5 more, or until the towers are cooked through.

Serves 4.

Read more...

Heirloom Tomato Tart

>> Monday, September 4, 2017


Heirloom Tomato Tart


Last summer, my friend Talea made me this tomato pie for lunch one day, and I loved it so much I got her recipe. It's actually a traditional recipe from the Lyons region of France, and perfect for those funny-looking heirloom tomatoes. I've been wanting to post this recipe for the last year.


Angela Williams Duea photography


Ingredients

1 single layer pie crust (we love this recipe for Murbteig pie crust, but pre-made is good and quick, too)
2 tbsp Dijon mustard
2 tbsp mayonnaise
4 ounces swiss cheese, grated
1 1/2 pounds fresh Heirloom tomatoes
1/2 tsp oregano
1 tbsp fresh basil leaves, sliced
1/2 tsp salt
1/2 tsp freshly ground black pepper
3 tbsp fine bread crumbs
1 tbsp Parmesan cheese
1 tsp olive oil


Heirloom Tomato Tart


Directions

Preheat the oven to 425 degrees. Oil a pie or tart pan. Place the crust in the pan and pinch the edges. If using fresh pie crust, place it in the freezer on wax paper for a few minutes before transferring it to the pan - it will hold together better.

Prick the crust all over and place in the oven. Bake for 20 minutes, until the crust is puffed and golden. Take it out of the oven and let it cool while making the pie ingredients. Turn the oven to 375 degrees.

Slice each tomato in half and squeeze out the seeds. Slice each half into 1/4" slices, and let them drain in a colander for 10 minutes (this helps prevent a soggy crust and a soupy filling). 

Stir together the mustard, mayonnaise, and oregano. Spread half of the mixture on the crust, then sprinkle on half of the cheese. Layer half the tomatoes over the cheese. Repeat with the second half of the mustard, cheese, and tomatoes. Sprinkle with salt and pepper.

Stir together the bread crumbs and Parmesan cheese, and sprinkle over the top of the pie. Scatter the basil leaves over the crumbs, then drizzle the pie with the olive oil. Cover with foil and bake at 375 for 20 minutes, then remove the foil and bake for 15-20 more minutes, until the crust is browned and the pie is cooked through.

Serve warm or at room temperature. Serves 4.

Read more...

Sun-Dried Tomato Harissa (Tunisian Chili Sauce)

>> Monday, August 28, 2017


Sun-Dried Tomato Harissa (Tunisian Chili Sauce)


Harissa is a hot pepper sauce from Tunisia, the northern-most country in North Africa with both a lovely Mediterranean coastline and the tip of the Sahara desert. This pepper paste can contain many different ingredients, but the base is a mixture of mild and spicy peppers with oil, caraway, cumin, coriander, and garlic.

Map of Tunisia in Africa
Map of Northern Africa - Tunisia is colored orange

Tunisia has been a crossroads of many cultures, the Saharan Berbers, the ancient Romans, the Middle Eastern Muslims. The food most resembles other North African and Arabian dishes, with lots of goat and lamb, spicy tomato sauces, almonds, lentils, dates, and olives. If you love couscous, thank the Tunisians - it might be called their national dish.

Saharan oasis in Tunisia


The city of Sousse, eastern Tunisia

Tunisian Beach
Tunisian Beach

Tunisia is definitely on our list of places to visit in our lifetime, for sure.

Now let me tell you about harissa! A small jar of harissa in your refrigerator is great for dressing up steamed vegetables or sandwiches, dropping into a stew or a stir-fry, spreading warm on toasted bread or pita, or adding to a meat marinade. Oh yeah, it's also tasty stirred into yogurt as a dip for fresh veggies. We included Middle Eastern ingredients of sun-dried tomatoes and mint, which adds a fresh, tangy dimension. 

We bet that harissa may make you cheat on sriracha sauce, but we don't blame you if you do.


Ingredients

1 1/2 oz cayenne or arbol peppers
4 oz pasilla or ancho peppers
4 oz sun-dried tomatoes
1 tsp caraway seeds
1 tsp coriander seeds
1/2 tsp cumin seeds
2 to 3 garlic cloves, peeled and minced
2 tsp fresh mint, chopped
2 tsp kosher salt, or to taste
2 tbsp olive oil, plus more for storing
1 tbsp lemon juice


Directions

Remove the stems from the peppers and shake out the seeds. Place them in a bowl with the tomatoes, and cover with boiling water. Soak for 15 minutes. Drain, retaining the water.

In a food processor combine chili peppers, garlic, salt, and olive oil. Blend, stirring frequently, and add a little of the water if the paste becomes too stiff. When well combined, add the remaining spices and blend to form a smooth paste.

Place in an airtight container and cover it with a layer of olive oil to keep it fresh. It will keep about 1 month in the refrigerator.

Makes about 1 cup.

Read more...

Chicken Peanut Soup (Ghanian Nkate Nkwan, Nkatenkwan, Nkate Nkwanin)

>> Sunday, August 13, 2017


Chicken Peanut Soup (Ghanian Nkate Nkwan, Nkatenkwan, Nkate Nkwanin)


This chicken stew in peanut sauce sounds like something you might find in a Thai restaurant, where they tend to use peanuts in main dishes. In fact, this stew was taught to my family by our adopted sisters from Ghana. It's a traditional dish there and is super-easy to make, and contains no unusual ingredients.

My parents are amazing humanitarians who have worked for social justice and world peace for decades. Early on, they realized they didn't know much about the often troubled African continent, so they set themselves on a self-study program to learn all they could about the countries of Africa. They believe that helping others starts with education and respect. Today, they know more about the social and political facts in Africa than some citizens of those countries.


About five years ago, Mom and Dad decided they wanted to be a support system for African students studying at the university at Bowling Green, Ohio. They realized how difficult it is for young adults to live nearly halfway across the world from their families and they wanted to be a second family.

That is how Elizabeth and Josephine Effah came into our lives. They are students from Ghana who were studying public health and policy. They are smart, kind, gorgeous, funny, and hard-working young ladies who have become part of our family. They've celebrated holidays and family reunions with us, and Mom and Dad have attended their graduations and other special events. We are truly blessed to have widened our family with new sisters. You can't have too many sisters, am I right?


Elizabeth, Josephine, and her son Myron

Elizabeth sent me this recipe recently. It is a traditional Ghanaian recipe that can vary widely, though the core ingredients of peanuts, chicken, tomatoes, peppers, and onions remains the same. It is spicy-hot and creamy all at the same time.

While researching the recipe, Joe and I learned that the name varies (Nkate Nkwan, Nkatenkwan, Nkate Nkwanin, and other variations). Peanuts are sometimes called "groundnuts" in Ghana. A different tuber called bambara was used centuries ago, but peanuts imported from South America by the Portuguese began to replace those groundnuts.

If you were in Africa, this stew might be served to you with the chicken bones, which you might like to gnaw for those tasty little bits that cling to the bones. You might also get some dumplings or a mound of a mashed potato-like substance; these are called fufu, made of pounded yams, cassava roots, or green plantains. Fufu is common in many central and west African countries. Through colonial slave trade and emigration, it has migrated over to the Caribbean and Central American countries as mofongo and other specialties. In west Africa, this peanut stew might also be served over rice, or with floating balls of sticky rice.


Effah Chicken Peanut Soup

Ingredients

1 large onion, chopped finely
1 green pepper (or orange or red) chopped finely
2 large boneless, skinless chicken breasts or thighs
1 tsp grated ginger
1 tsp ground cayenne pepper
6 cups of water
16 oz. of natural chunky peanut butter (no sugar)
1 8 oz. can of tomato sauce

Directions

Mix peanut butter with 4 cups of water and blend with whisk. Begin cooking on low heat, stirring often.  Meanwhile, in a fry pan, mix chicken, onions, and peppers. Cook until chicken is cooked through.  Add to peanut mixture with seasonings and some salt. Add tomato sauce and two more cups of water. Cook with frequent stirring for an hour on low heat. Do not cover. Some like it over rice. It is good without chicken, too.

Serves 4-6.

Read more...

Sake-Marinated Salmon

>> Friday, August 4, 2017


Sake-Marinated Salmon


Our local grocery store just had a $1.99 a pound sale on salmon fillets, which is about as cheap as I'd ever seen. These fillets were a little thin, but still tender, and they were begging for a delicate marinade instead of the big bold flavors that usually go well with salmon.

I remembered the bottle of sake stored in our bar since - oh, I don't know when - and made a nutty marinade with it. Wasabi or white horseradish gives the fish a little kick, too. The final ingredient is lovage, from a friend's garden. This herb is popular in French and German cooking and boasts a flowery celery flavor. If a friend doesn't have any, snip off the leaves from a stalk of celery and use those instead.

This marinade will work with any fish, but thin fillets are probably best.

Ingredients

4 4-6 oz salmon fillets
1 cup dry sake
1 tsp wasabi paste or horseradish
1 tbsp vegetable oil
1 1/2 tsp lovage, or celery leaves
1/4 cup chives, snipped
Salt and pepper to taste
2 tbsp sesame seeds (optional)

Directions

Wash the salmon fillets and pat them dry. In a bowl, whisk together the remaining ingredients. Place the fish in a platter and pour the marinade over them. Turn them over until the marinade is on all sides. Allow to absorb the flavors for at least 1 hour before grilling or roasting.

Top with toasted sesame seeds before serving, if desired.

Serves 4-6.

Read more...

Pesto Potato Salad Nicoise

>> Friday, July 21, 2017


Pesto Potato Salad Nicoise


This main-dish potato salad is a delightfully different take on the ordinary summer staple. It combines the classic French nicoise salad with a creamy pesto-based dressing. Perfect for our memories of Nice, which also remind Joe of Italy.


The first time Joe was in Nice, he was there on business for a French pharmaceutical company. He didn't get to enjoy much of the seaside life until his day off. Then he went on a countryside run that skirted the Mediterranean nearly to San Remo over the Italian border, before heading back for lunch. He ordered a classic salade Niçoise, which is usually a cold composed salad of potatoes, olives, tomatoes, sardines, tuna, and green beans.

Our version is a a cool summer salad that looks pretty fancy on a platter and gives you something new to do with potato salad. I've already made it a couple of times this summer - and ate the leftovers yesterday at lunch.

Pesto Potato Salad Nicoise


Ingredients

For the pesto

3 tbsp basil leaves
2 tbsp Parmesan cheese, grated
2 tbsp pine nuts
1/2 tsp lemon juice
3 tbsp olive oil

For the salad

2 eggs
6 medium potatoes, scrubbed
2 cups green beans, rinsed and cut in half
1 stalk celery, diced
1/2 cup white onion, finely sliced
1 6-oz can tuna packed in water, drained
1/4 cup black olives, sliced
1 tbsp anchovy paste
2 tsp salt
1 cup mayonnaise
2 tsp lemon juice
2 large tomatoes, cut into wedges
1 head of romaine lettuce, separated into leaves

Directions

Blend together all pesto ingredients until smooth. Stir together with the mayonnaise, lemon juice, salt, and anchovy paste, and chill the sauce.

Boil the eggs and potatoes until the potatoes are just tender; drain and rinse with cold water. Chill, then cut the potatoes into bite-sized chunks and the eggs into wedges. Place the green beans in boiling water and blanch for 3 minutes, then immerse them in cold water to stop the cooking. 

In a large bowl, stir together the potatoes, green beans, celery, onion, tuna, olives, and sauce. Place the lettuce leaves on individual plates or a large platter. Mound the salad on the lettuce, then arrange the egg and tomato wedges around the salad. 

Serves 4-6.

Read more...

Mini Confetti Quiches

>> Sunday, July 9, 2017


Quiche crust in muffin cups


The Hungry Lovers home is very busy these days - Joe's working long hours to manage the employees in his financial practice, and I'm working on a bunch of new photography and writing projects at night and on weekends. With him off to early appointments and late networking events, I decided to come up with a make-ahead healthy and hearty breakfast for him to eat on the run.

These mini quiches can be made with any combination of ingredients. To make a pretty confetti-colored quiche, I used egg whites and low-fat Swiss cheese,  then added broccoli, red pepper, fat-free ham, and green onions. I froze these in their cupcake papers so wecan pop them in the microwave while we are packing for work, and then take them on the road.

Ingredients

1 10" low fat frozen pastry crust (if you don't like frozen, you can make your own)
3 cups egg whites or egg substitute, or 12 eggs
1/4 cup broccoli florets, finely chopped
1/4 cup red bell pepper, finely chopped
1/4 cup green onions, thinly sliced
1 slice low-fat ham, finely chopped
1/4 cup Swiss or provolone cheese, shredded
Salt and Pepper to taste
2 tsp basil, minced
1 tsp celery seed
1/8 tsp nutmeg

Directions

Preheat the oven to 375 degrees.

Place parchment baking cups into a 12-cup muffin pan. Lay the thawed pastry on a cutting board.  With a round cookie cutter or water glass, cut the pastry into 12 circles. Press one circle into the bottom and partway up the sides of each baking cup.


If using whole eggs, beat them together. Then add the rest of the ingredients to the eggs. I mixed these in a large glass measuring cup with a nice pouring spout, so I could easily pour the mixture into each paper cup. Fill them to nearly the top; leave a 1/4" space for the eggs to expand.


Mini quiches ready for baking


Bake for 15-20 minutes, until the eggs are fluffy and set, and a toothpick inserted in the center of the quiches comes out clean. Let cool.

These can be heated up in 45 seconds from the refrigerator, or about 1.5-2 minutes from the freezer.

Makes 12 mini quiches.

Read more...

The Dining Room at Kendall College

>> Friday, June 30, 2017


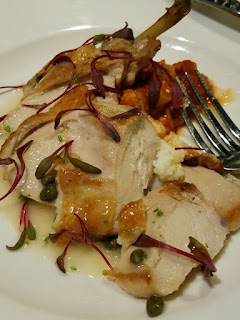
Chicken Piccata at Kendall College

We dined here for the first time for Restaurant Week and were so glad we did! Interestingly, we had dined at Naha the night before and Kendal blew them away in terms of flavor pairings and portion size.

We started with Mushroom Risotto / Parmesan Tuile / Huile d'Persil and the Wok Seared Scallop / Pumpkin Ravioli / Dashi Broth / Bonito / Togarashi Sichimi. They were both wonderful, but my scallop in dashi broth was the real standout - perfectly cooked, lovely broth, and the pumpkin ravioli was the best counterpoint. It was served with a tangy olive bread and sage-infused butter. An amuse-bouche of two veggie sushi bite kept us eager for more.

My Roast Chicken Piccata / Chives / Chives / Whipped Ricotta Sesame Grits / Capers / Yellow Squash Provençal / Chicken Jus entree was amazing. Chicken Piccata sounds a little boring but this portion of breast and wing was tender, juicy, and alive with flavor. The grits were nice and creamy, but the yellow squash was a real surprise. It was in a sort of tomatoey agro-dolce sauce that I can't wait to recreate.

My husband has the Grilled Strip Loin / Chimmichurri / Curried Jasmine Rice / Pickled Ginger Salad / Romesco Sauce which was like a rave party of flavor! So much going on in the dish, but the tastes cooperated in making the dish exceptional.

Hazelnut Dark Chocolate Mousse at Kendall College


For dessert, I was going to have Bingsu but the Hazelnut Dark Chocolate Mousse / Dark Chocolate Mousse / Hazelnut Crunch / Orange Anglaise / Hazelnut Whipped Cream / Chocolate Cake won out. It was lovely as well as delicious. Joe had a peanut butter/bacon cheesecake with bananas and it was amazing.

I can't believe we waited so long to visit this place. The dining room is comfortable and tranquil, with enormous windows showcasing the skyline to the south, and the windows into the kitchen let us enjoy watching the students hard at work. Service was impeccable and prompt. Around the dining room and some adjoining halls are displays of antique kitchen equipment which you really shouldn't miss seeing. On top of all that - free plentiful parking! We're big fans.

Kendall College is at 900 N North Branch St., Chicago, IL 60642.

Read more...

Edamame and Grilled Corn Salad

>> Sunday, June 18, 2017


Edamame and Grilled Corn Salad


This quick salad is fresh and full of healthy ingredients. It's perfect with Veracruz-style Tilapia grilled in foil packets - one of our favorite ways to cook fish.

We like to use the edamame without pods in the frozen vegetable section of the grocery store. I made the vinaigrette with a Mexican lime-infused olive oil that my sister gave me for Christmas. Beth and my mom visited the Queen Creek Olive Mill in Phoenix, AZ in December, and also brought me feta-stuffed green olives. I think I'm going to raid the olive jar when I'm done with this post!

If you don't have any Mexican lime-infused olive oil handy, try 1 tbsp of lime juice and plain olive oil - or mix in whatever flavor you do have. This salad recipe is very flexible.


Ingredients

3 ears corn
12 oz. frozen edamame
1/4 cup red onion, finely chopped
1/3 cup red bell pepper

For the Vinaigrette

1/4 cup lime olive oil
1/3 cup red wine vinegar
1 tbsp garlic powder
1 tsp celery seed
1 tsp ground cumin
1 tsp cracked black pepper
2 tsp salt


Directions

Heat the grill to medium. Shuck the corn and brush with a little oil. Grill on all sides, turning frequently, for about 10 minutes, until the corn is barely cooked and lightly browned. Allow to cool, then cut the kernels from the cob.

Steam the edamame in the microwave or on the stove until tender, about 15 minutes. Rinse with cold water to chill, then let it drain thoroughly. Stir in the corn, pepper, and onion. Shake together the vinagrette ingredients and pour over the salad. Let it chill for at least an hour before serving so that the flavors blend together well.

Serves 4-6.

Read more...

Braised Fava Beans with Pancetta (Stufato di Fave, Stufato di Baccelli)

>> Sunday, June 4, 2017


Braised Fava Beans with Pancetta (Stufato di Fave, Stufato di Baccelli)


If we were in Italy right now, chances are we'd find a dish of fresh young fava beans braised with pancetta, broth, and tomato on our dinner table. This is a classic early summer dish that's just popping with flavor. It also works well with butter beans or limas.

For a few weeks now, I have been seeing fresh fava beans in the pod at our local grocery store but didn't have a craving or a specific recipe in mind. Then the other day, I saw a large heel of cured pancetta (half a pound!) in the reduced section of our deli. The price was irresistible, and I began thinking of braised fava beans.

But when I went back to the store with the beans, not a single fresh fava was found. I bought a frozen package, finally, since I wasn't going to give up my stewed bean craving that easily. The shelled frozen beans tend to be more mature, so I blanched them and slipped them out of their skins so they'd be tender. Fantastic.


Ingredients

1 pound fresh shelled fava beans, or 20 oz. frozen favas
1 tbsp olive oil
4 oz pancetta, finely chopped
1 small red onion, chopped
1 tsp salt
ground pepper
1/2 tsp sugar
1 garlic clove, minced
2 tbsp fresh Italian parsley, chopped
2 tbsp tomato paste
1 cup water

Directions

If using frozen fava beans, boil a small pot of water. When it reaches a boil, put in the beans and cook for 1 minute. Soak the beans in ice water for one minute, then peel off the outer skins. I found it easiest to pull off the dark stripe at the top; the rest of the skin comes right off with that strip.


Heat the oil in a medium frying pan, then cook the pancetta and onion until soft and slightly browned. Stir in the rest of the ingredients and bring to a boil. Reduce heat, cover, and simmer for 15 minutes, or until the beans are tender and the sauce has thickened.

Serves 4 as a side dish, or 2 as a main meal.

Read more...

Blanquette de Veau (French veal stew with white sauce)

>> Sunday, May 28, 2017


We first had this classic French veal stew at Froggy’s Café – you know, that French place we rhapsodize about. We consulted with Julia Child on the recipe and experimented a little on our own to come up with the recipe here.

While this is technically a basic stew, it's upscale enough for a fancy dinner party. The lovely creamy sauce and tender, buttery veal are a treat for special friends. 

We’ve noticed that some classic French recipes can be rather one-note. For example, the original recipe called for cooking the veal with a carrot, celery stalk and onion, but then discarding everything. The result is the stew contains just meat, mushrooms, and the very flavorful gravy. We switched it up a bit so that we keep all the vegetables in the stew. You might want to play around with this too – but perhaps experiment on something cheaper than veal!


Ingredients

For the Bouquet Garni (Herb bundle)
3” cheesecloth square
Kitchen Twine
1 tbsp parsley leaves
2 cloves
1 bay leaf
1 tsp fresh thyme
6 black peppercorns

For the Stew
2 lbs. boneless veal shoulder, cut into 1″ chunks
2 stalks of celery cut into 1″ pieces
1 cup chicken or vegetable stock
1 cup pearl onions
1.5 cups baby carrots cut in half
10 oz. of mixed mushrooms, such as shiitake, white, crimini, and oyster, sliced
¼ cup sherry
3 tbsp. unsalted butter
2 12 tbsp. flour
½ cup heavy cream
Salt and white pepper to taste
Cooked white rice, for serving
Parsley leaves, to garnish

Instructions

Wrap the herbs in the cheese cloth and tie with the twine. In a large pot, place the veal, onions, carrot, celery, broth and enough water to partially cover the food. Bring to a boil, cover and reduce heat, and simmer one hour. Skim off the scum as it forms. Be careful not to overcook the veal as it will turn to mush!

Add the mushrooms and sherry and cook until the vegetables are tender. Remove the meat and vegetables to a platter and keep warm; return the broth to the pot.

 In a small saucepan, melt the butter. Whisk in the flour and stir in one cup of the veal broth, stirring until smooth. Slowly stir the white sauce into the large pot, add salt and pepper to taste, and simmer gently until it is thickened. Stir in the cream. Return the meat and vegetables to the pot and heat through. Sprinkle with parsley after plating.

Serve over white rice, noodles, or alone with crusty bread.

Serves 4.

Read more...
Related Posts Plugin for WordPress, Blogger...

  © Blogger template Simple n' Sweet by Ourblogtemplates.com 2009

Back to TOP