Showing posts with label Appetizer. Show all posts

Candy Cane Lollipops

>> Saturday, December 22, 2018


Candy Cane Lollipops


On Thursday, I was going to my friend's holiday cookie exchange, and I really wanted to do something different this year. Twenty or thirty ladies get together for this party, all wonderful cooks and creative women, so these cute little lollipops were the perfect thing to bring.


I didn't know that if you put mini candy canes into a warm oven for a few minutes, they soften enough to mold around lolly sticks. It turns out there is about a ten-second window between "softened enough to mold" and "melted into a flat red-and-white blob".


It took us quite a while to figure out the correct moment to pull them out of the oven. What I can tell you is that candy canes vary in softness so that temperatures and times are just suggestions. Try testing one or two first so that you don't ruin an entire pan (or two) and have to run back to the store for replacement candy canes. Yes, we had to do that the other day.

Heart-shaped Candy Cane Lollipops


Don't let this intimidate you, though. These are super easy to make and I got SO many compliments at the cookie party.


Ingredients

32 mini candy canes
16 6-inch lollipop sticks
12 oz almond bark or white chocolate chips
3-4 drops peppermint oil
Christmas-colored candy sprinkles

Directions

Heat the oven to 235 degrees. Line a baking sheet with parchment paper. Arrange pairs of candy canes into a heart shape, leaving room underneath each one to insert the stick after they come out of the oven.

Heat the candy canes for 4-7 minutes, until just soft enough to press a stick into each heart. We noticed that our canes developed little candy bubbles along the surface at just the right moment.

Slide the parchment and candy onto a counter and quickly press the lollipop sticks upward into the curved center of the two canes, then pinch the two bottom edges around the stick. If they don't stick securely, don't worry - the chocolate will hold the whole heart together. Let cool for a few minutes.

On the stove over low heat, or in the microwave, heat the almond bark or white chocolate until melted smooth, stirring frequently. If you heat it too long, it will become grainy with sugar crystals; just stir in a bit of coconut oil or shortening and beat it until smooth. Stir in the peppermint oil. Spoon a little chocolate into the center of each heart, then decorate with the candy sprinkles. Let the chocolate harden before serving.


Makes 16 lollipops.

Read more...

Fried Sage Leaves (Salvia Fritta)

>> Saturday, October 13, 2018


Fried Sage Leaves (Salvia Fritta)
Thanks to Lawrence Rice for capturing these luscious leaves. :)

Just as the last leaves fall and the first snows start, a sage bush in the herb garden is still pumping out leaves. That's probably why sage is such a traditional part of Thanksgiving seasonings. In Tuscany, we found that they're in love with sage, too. We swooned over a small side dish of fried sage leaves that accompanied a rosemary-scented porterhouse steak. Now we're fried-sage evangelists.

Sage is a powerful herb, but the light crust and quick frying transforms the leaves into a mellow crispy treat, kind of like a flavored potato chip. These are wonderful alongside any kind of meat, or as a good snack or appetizer. You might find yourself whipping up a batch to sprinkle over a vegetable or grain dish, too.

Actually, we have trouble getting them to the table, since we like to munch on them while we're putting the finishing touches on dinner. Yes, they're that good.

Ingredients

24 large fresh sage leaves
1 egg
2 tbsp water
1 cup all-purpose flour
½ tsp salt, plus more for sprinkling before serving
Vegetable oil for frying

Directions

Preheat the oven to 200 degrees. Rinse the sage leaves and pat them dry with paper towels.

Whisk together the egg and water in a shallow bowl. In a plate, stir together the flour and salt. Layer a platter with paper towels to drain the cooked leaves. 

Pour about 1 inch of oil into a large frying pan and heat until a drop of water sizzles on contact. Working quickly in small batches, dip the leaves into the egg mixture, let the excess drain off, then dip them into the flour and shake off the excess. Drop them into the oil and cook until barely golden - do not let them brown, as this will make them taste bitter.

Drain the cooked leaves on the paper toweling, and set the platter in the oven to keep them warm while you finish the rest of the leaves. 

Sprinkle with salt before serving.

Read more...

Too-Hot-To-Cook Veggie Pizza

>> Sunday, July 29, 2018

Too-Hot-To-Cook Veggie pizza


This recipe has been around for a while, but it's still an easy favorite for me and my daughter to make together. We first tasted this when a dear friend brought it to a potluck as an appetizer and shared the recipe all around. When Jessie moved into her first apartment and asked for recipes for her favorite foods, I bought her a cookbook and hand-wrote the recipes she loved best, including this one. We recently made this pizza together in her kitchen.

This is an easy dinner to make when it's too hot to cook, because it only requires a few minutes in the oven and then it cools in the fridge.

Cool Veggie Pizza

Ingredients

1 tube of crescent rolls
8 oz. cream cheese, softened
2/3 cup mayonnaise
1 package Hidden Valley Ranch seasoning
1 small onion, chopped
1/2 cup red pepper, chopped
1 cup broccoli, chopped
2 tomatoes, chopped
1/2 cucumber, chopped
1 cup mushrooms, sliced
1/2 cup black olives, sliced
(add any other chopped vegetables that you like)
2 cups shredded cheddar cheese

Directions

Unroll the cresecent roll dough and flatten into a greased 9x11 pan, pressing the dough up the sides of the pan and sealing the pre-cut seams between each roll. Bake the dough according to the package directions until golden brown. Allow to cool.

Mix together the cream cheese, mayo, and ranch seasoning. Spread on top of the crust in the pan.  Sprinkle with all the veggies and top with the shredded cheese. Refrigerate before serving.

Serves 4-6

Read more...

Paul's Pork Wontons

>> Sunday, May 13, 2018

This easy recipe for pork wontons is one that my step dad Paul learned when he was teaching agricultural methods in Vietnam during the war. My mom calls them "little porkies".

In this photo, Paul is grilling with his brother in my parents' annual family barbecue, the August Corn Fest. They set up big tables and chairs on the back acre that was once used as an animal paddock, and grill up a couple hundred ears of corn picked from their fields. He's a good griller as well as a cook.

The wontons in the picture below have been steamed. They can be fried, steamed, boiled in soups, or whatever else your imagination suggests. Here is my Dad's recipe.


Ingredients

1 lb. Ground Pork
1/2 cup green onions, diced
2 tsp ground ginger
2 garlic cloves, minced
Won Ton Skins
Hot Chinese Mustard
Teriyaki or Soy Sauce

Directions

I take a pound of ground pork and cut into 4 sections. This gives us about 12 to 14 pieces per section. Mix diced green onions, ginger, and garlic into the pork.

Take one wonton skin and wet one side with water, place a dash of ground pork on the center of the wet won ton (amount of pork is determined by you) and then fold the wonton and seal. Place on plate to deep fry later.

The original process calls for rice paper instead of wonton skins. Rice paper comes dry but need to be moistened with water so it can be rolled with ground pork in it.

Deep fry the wonton skins with the pork. I use a skillet with frying oil. Caution: warm oil slowly and do not over heat or the little porkies will come out dark brown and raw inside (that’s a no-no). When lightly brown and floating on the oil, turn them over to cook on the other side for about the same time.

Mix to taste, teriyaki or soy sauce with Chinese Hot Mustard. Dip deep fried wontons into the sauce and enjoy. We serve the cooked won tons with a vegetable stir fry over rice. 

Note: The original sauce is fish sauce with nothing added.
Serves 4.

Read more...

Tuscan Marinated Eggplant Salad (Ensalata di Melanzane)

>> Sunday, March 11, 2018


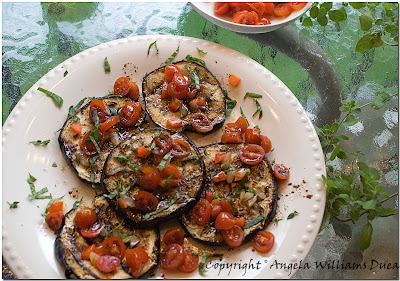
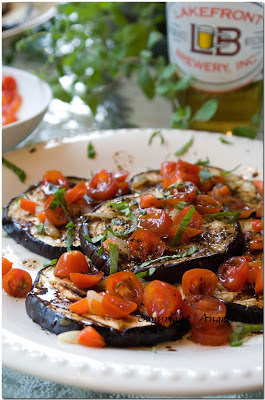
Tuscan Marinated Eggplant Salad (Ensalata di Melanzane)


Joe and I spent the first day of our honeymoon in the airport in Rome waiting for a flight to Pisa, where our luggage had gone and where our rental car was waiting. We missed our connecting flight because of slow lines going through Customs. After several hours, and a couple more cancelled flights, we decided to rent a car and drive up to our cottage in Tuscany.


I didn't even make it out of the parking garage before crawling into the back seat and going to sleep. I was struggling with jet lag and exhaustion from weeks of wedding arrangements. I couldn't drive a stick shift anyway, so I wasn't much use in driving the Autostrada.

We were hours late in arriving at the Agriturismo where we would spend the next week. Our hosts at Rosa dei Venti, who operated the hotel and villas on an ancestral working farm, welcomed us with prosecco and a meal they'd made especially for us: an antipasti plate of sausages and cheeses, marinated eggplant salad, a meaty pasta sauce called Ragu di Carne, a stewed rabbit and chicken dish (coniglio in umido alla toscana), an apricot tart, and fresh figs from the tree next to our cottage.


They also brought two bottles of hearty Barbaresco wine, and we toasted everything we could think of. The family's German Shepherd, Azzo, nosed his way into our villa and sat down by the hearth. We tossed him scraps of rabbit and practiced our Italian. Azzo pricked up his ears no matter which language we spoke to him.


Later, we lay out in the grass and listened to the festival in the tiny town of Creti below us, the high-speed bullet trains rushing from town to town, and the sunflower heads rattling against each other in the vast field to the north. It was a beautiful day.


Tuscan Marinated Eggplant Salad (Ensalata di Melanzane)

Ingredients

1 medium eggplant
1/2 cup fresh flat-leaf parsley
2 tbsp red wine vinegar
3 tbsp olive oil
salt and pepper to taste
1 cup chopped Roma or plum tomato
1 clove garlic, minced
2 tbsp fresh basil, snipped


Directions

Slice the eggplant lengthwise into 1/2 inch thick pieces. Heat a dry griddle and sprinkle it with salt. Toast the eggplant on each side until brown and tender, about 5 minutes per side. Finely chop the parsley.

Place the eggplant on a platter. Drizzle with vinegar, 2 tbsp olive oil and scatter the parsley evenly over the slices. Sprinkle with salt and pepper. Marinate for at least 1 hour at room temperature.

Cut the tomatoes into a small dice and let the juices drain out in a colander or sieve. Stir in the last tbsp of olive oil, the garlic, and the basil. Spoon the tomatoes over the eggplant just before serving it at room temperature.

Serves 4-6 as a side salad, or 8-10 as an appetizer.

Read more...

Our Favorite Party Appetizers

>> Wednesday, January 31, 2018


I'll be honest, we're not usually football fanatics, but we love a good Big Game commercial as well as anyone. One year, a friend of ours had a source that leaked the commercials to her a week ahead of time. At her party, she gave us a little game sheet to play "Guess the Commercial?" Her clues were pretty hilarious, and nobody got up to use the bathroom in the breaks.

Elote (Creamy Corn) Dip

Elote (Creamy Corn) Dip


These appetizers are really any kind of party snacks. A lot of these have been well-loved by our monthly bible study group and our Cooking Party friends.

Roasted Red Pepper-Pine Nut Bruschetta

http://thehungrylovers.blogspot.com/search/label/Appetizer?updated-max=2013-03-22T07:01:00-05:00&max-results=20&start=16&by-date=false

Joe has been making the roasted red pepper-pine nut bruschetta since I first met him, and if he ever starts wondering what he should make for the next get-together, I always suggest this one. There's some sort of magic that happens when you let the nuts, fresh roasted peppers, garlic, golden raisins, and herbs marinate together. I'd really like a bowl of that right now.

Salted Caramel Dreamboats

http://thehungrylovers.blogspot.com/2012/12/salted-caramel-dreamboats-and-turtles.html


I learned how to make chocolates in my Grandma's cake and candy store, and I love throwing a candy-making party with my friends. These are truly addictive little bites, so you might want to make a big batch. They're super easy to make!

P.S. I call these "dreamboats" because once in a while my grandma would talk about the days when she dated grandpa, and he was a real dreamboat. That translates just fine over generations.

Hot Reuben Dip

http://thehungrylovers.blogspot.com/2013/10/hot-reuben-dip.html

We usually make this in the fall, because it kind of fits an Oktoberfest theme or maybe it's just a fall type of food. One time we showed up a day early for our friends' Oktoberfest party, then stayed to help them cook, including this dip which I immediately needed to make again. Awesome.

Seafood-Stuffed Portobella Caps

http://thehungrylovers.blogspot.com/2014/01/seafood-stuffed-portobello-caps.html


This may be a bold statement, but I believe you could stuff just about anything in a mushroom cap and I'd like it.

Eat well, my friends!

Read more...

Seafood-Stuffed Portobello Caps

>> Saturday, December 16, 2017


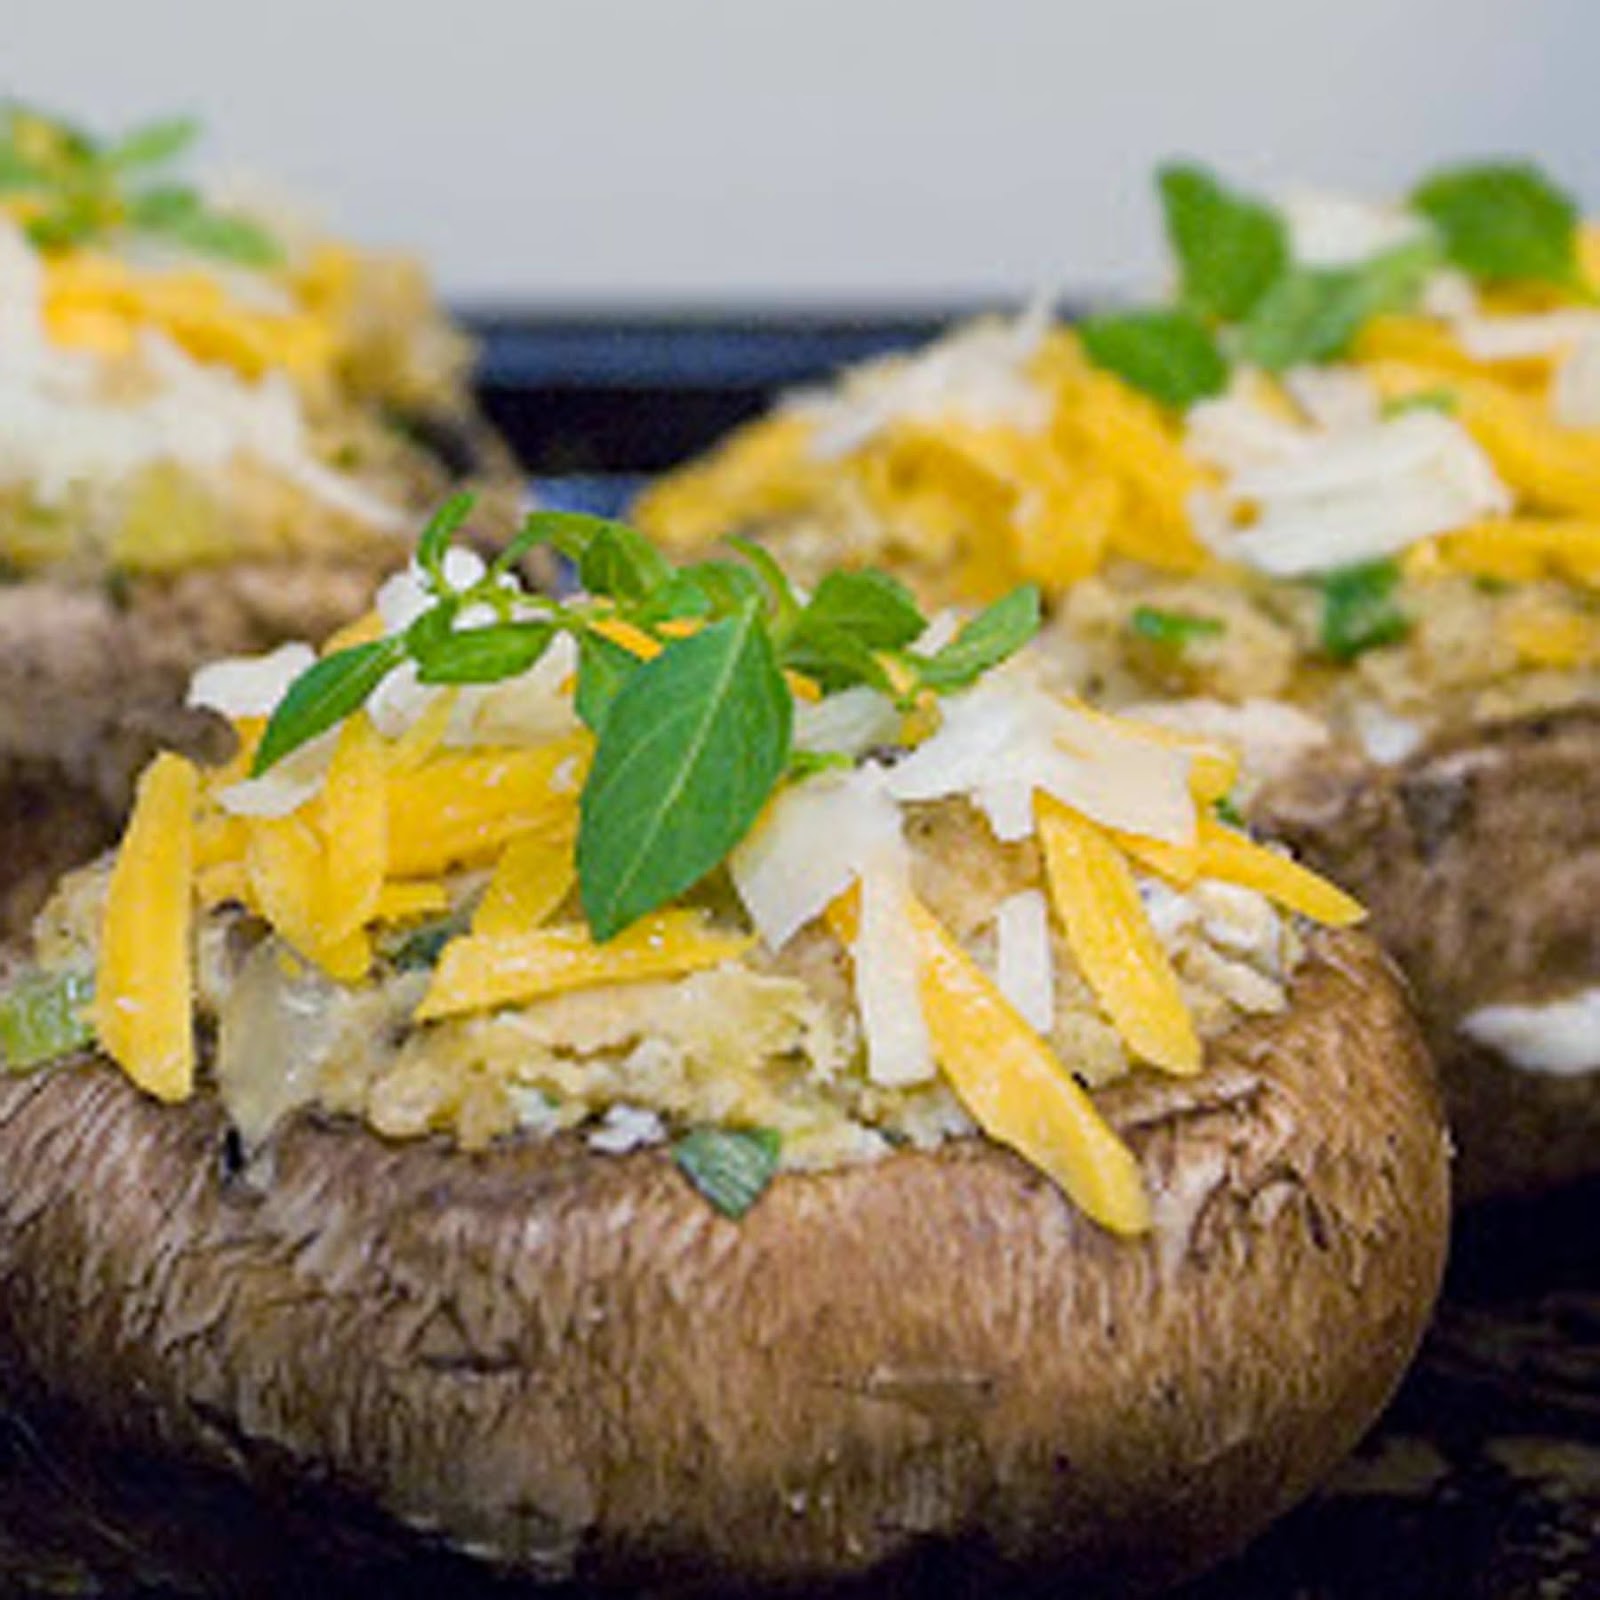
Seafood-Stuffed Portobello Caps


I'm torn between presenting this stuffed mushroom recipe as an appetizer or a meal. If you want to use baby portobellos (crimini mushrooms) or white button mushrooms instead, these make a tasty bite-sized appetizer. We stuffed them with white fish and shrimp, but if those are not your favorites, stuff them with any seafood combo you like.


Shrimp stuffed mushrooms


Ingredients

2 tbsp oil
1/2 cup chopped white onion
1/3 cup chopped celery
1/2 small jalapeno, seeded and minced
4 oz. any kind of white fish, chopped
3 oz. shrimp, cleaned, tails removed, and chopped
2 tsp Old Bay seasoning
1 tbsp butter, melted
1 cup white bread crumbs
3 tbsp grated Parmesan cheese
8 large portobello mushrooms, or 1 pound white mushrooms
3 oz. sharp cheddar cheese, shredded

Optional
1/4 cup mayonnaise
1 1/2 tsp wasabi paste or powder

Instructions

Remove the stems from the mushrooms and finely chop them. Grease a baking sheet and set the mushroom caps on the sheet. Preheat the oven to 350 degrees.

Heat the oil in a medium skillet. Add the mushroom stems, onion, celery, and jalapeno, and saute until tender. Add the chopped fish, shrimp, and Old Bay spices and cook until just opaque. Try not to over-cook the shrimp, because they'll get rubbery.

In a bowl, stir together the butter, bread crumbs, and Parmesan cheese. Add the seafood mixture and stir well. Fill each mushroom cap with the fish stuffing and top with the shredded cheese. Bake at 350 degrees 20-30 minutes, until the mushrooms are tender and the filling is bubbly and toasted on top.

If you want, whisk together the mayonnaise and wasabi. Just before serving, drizzle the wasabi mayo over the hot mushrooms. Serve the mushrooms piping-hot.

Serves 4 as a main meal; serves 6-10 as an appetizer.

Read more...

Smoked Salmon and Cream Cheese Rollups

>> Sunday, April 30, 2017


Smoked Salmon and Cream Cheese Rollups


My bio-dad, Rick, was an avid fisherman in Southwestern Michigan. His first fishing boat, the Cricket, was a little four-seater that he took out on the small sleepy lakes that speckled our county. On foggy early mornings, a thermos of coffee for him, hot chocolate for me, our gear and a good book, we were off into the lilypads and quiet inlets of Little Paw Paw Lake.


I don't remember whether I actually caught any fish, and I have a hunch than my dad might have allowed me to claim that the fish I'm holding in the picture were ones that I bagged. I didn't like the whole fishing process - I felt sorry for the worm, sorry for the fish, and grossed out by touching the bait. But I did love to drowse in the sun with a good book and hang out with him. He was not very talkative on the boat but could tell a good story.

Later on, he traded up into a bigger boat, the SherAn (a combo name of his daughters Sheryl and Angela). I can't tell you anything about boats or sizes but the engine was bigger, there was storage under the seats instead of lake water, and there was a glass windshield. There was also a Fish Lo-K-Tor and downriggers that Rick hand-machined and lovingly attached. He was taking this one out on the big lake.

Rick caught steelhead trout, coho salomn and sturgeon on Lake Michigan, and went smelting in the spring off the St. Joseph piers. One of the most scary and exhilarating sights was to head off from a storm barrelling across the lake, when there was only the boat, the gray water, the rain, and the sky. The horizon was a seamless blend of lake and air. Seems like we always came home ravenous.


One year he bought a four-shelf smoker about three feet tall, and began smoking the fish for a change of taste. His smoked coho salmon was brown-fleshed, rather than the bright color of ocean salmon, but densely flavored and tender.

Recently, a friend gave me a gift of home-smoked salmon, and it brought back all kinds of memories of boats and reading Zilpha Keatley Snyder and Native American legends and steaming rich plastic cups of cocoa, and my dad telling me pay attention, I had a bite.

Fishing season has begun on Lake Michigan, though I no longer have a boat. If you have avid fishing friends with access to a fish smoker, they might offer you a few pieces of fresh-smoked coho or steelhead. I made these smoked salmon rollups with my friend's fish, and each morsel was a taste of the past.

Ingredients

1/2 cup chives, chopped
2 tbsp fresh dill, chopped
1 tsp lemon zest
8 oz cream cheese at room temperature
4 oz smoked salmon
1 small cucumber
12 spikes of green onions
8-10 flour tortillas

Directions


Mix well the chives, dill, lemon zest, and cream cheese. Slice the salmon as thinly as possible. If you have a kitchen mandolin, this might help. My salmon had been frozen and was rather crumbly when I defrosted it, so I shredded it instead.

Thinly slice the cucumber lengthwise. I bet a kitchen mandolin would work well for this too, but I don't have one so I used a vegetable peeler.


Bend the package of tortillas back and forth a couple of times to prevent them from sticking together. Microwave the package for about 30 seconds until they are pilable. Usually I would heat tortillas on a dry griddle, but this recipe needs soft, moist flour tortillas.

Spread about 1 1/2 tbsp of the cream cheese mixture on each tortilla, making sure you spread it clear to the ends of each one. Place the salmon, cucumber, and green onions lengthwise in the center half of the tortilla. I added a little more dill because I love it fresh. Starting at the left side, tightly roll up the tortilla to the other side, stuffing in the ingredients if they start to roll out. Seal the seam with the cream cheese on the other side of the wrap. Chill for 30 minutes.

Slice each roll into 1-inch pieces. I cut off the misshapen ends where there were few ingredients and Joe and I quality-checked those. It was good. We served them on their sides so you could see the spiral design of the salmon rollups. Yum!

Makes approximately 60 little rolls.

Read more...

Big Game Sunday Party Food

>> Sunday, January 29, 2017

Super Bowl Sunday appetizers


I love me some good fattening appetizers, full of cheese and bacon and other gooey, unhealthy things, especially when a football game is involved. Big Game Sunday calls for lots of finger foods, right? Here's a roundup of some of the most drool-inducing appetizers recipes I found around the web for a football party, or any appetizer-worthy occasion.

If you try any of these for a party, leave me a note and tell me how you liked them!


Pizza-on-a-Stick


Vegan Creamy Cucumber Rollups


Bacon Double Cheeseburger Dip


Buffalo Chicken Mini-Meatballs


Won Ton Chicken Tacos


Jalapeno Poppers with Chorizo and Chihuahua Cheese


Snickers Dip


Apple Pie Fries

Read more...

Turkey / Chicken Croquettes with Aioli Sauce

>> Thursday, February 11, 2016


Croquettes are traditionally served as tapas in Spain. My Spanish teachers have told me that in many places in Spain, the large meal of the day is around noon and people sometimes take off a couple of hours for lunch. After work, people often go to the bar/restaurants for a drink and a few little bites to eat - tapas. If you live in a small town, you might have to make the rounds of the two or three pubs around you, for fear of insulting one of the innkeepers.

Like many places in Europe, bars are not intended as adults-only spots, but as an extension of a family's living room. Kids play on the floor, people take turns singing with the band, teens giggle in the corner, and everyone catches up with their neighbors before going home for a light meal and bed. Doesn't that sound wonderful?

The original recipe comes from Kim and Ellory's Kitchen, a fantastic personal chef and catering service in the Northern Suburbs of Chicago. They gave fun tapas cooking demonstrations for Joe's business clients and friends each year. Sadly, Ellory has passed away and Kim is cooking in New Orleans, but they left behind wonderful memories with us.

Ingredients

Aioli Sauce (Garlic Mayonnaise)

3 cloves of garlic, minced
1 egg, at room temperature
1 cup olive oil
1 tbsp lemon juice
1/4 tsp chili powder

In a blender, mix the egg and garlic for 15 seconds. Gradually add the olive oil while continuing to blend, then slowly add the lemon juice and chili powder while blending. Chill before serving.

Croquettes

4 tbsp butter
4 tbsp flour
3/4 cup milk
1/8 tsp nutmeg
6 oz cooked turkey, chicken, ham, or fish, finely minced
2 oz cooked pancetta or lean bacon, finely minced
2 tsp fresh parsley, chopped
2 tbsp red or green pepper, minced
1/2 tsp salt
1/4 tsp pepper
2 eggs, beaten
1 cup fine bread crumbs

Directions

Follow the aioli directions above, then refrigerate for 30 minutes before serving.

In a small sauce pan melt the butter. Add the flour and stir until well mixed. Slowly pour in the milk and keep cooking until thickened and creamy. Stir in the nutmeg.

In a mixing bowl, stir together the turkey, parsley, red pepper, salt, and pepper. Add to the white sauce. Put it in the refrigerator and allow it to cool at least 2 hours.

Divide the mixture into 20 balls and dip into the beaten eggs, then roll in the bread crumbs. Return to the refrigerator to cool for 30 minutes more.

Deep fry the croquettes until golden brown, or bake on a greased cookie sheet at 375 degrees for 20-30 minutes, until golden and crunchy.

Serve with aioli sauce for dipping.

Makes 20 croquettes.

Read more...

Replay: Pumpkin Patch Cheese Bites

>> Monday, October 26, 2015


pumpkin patch cheese balls - appetizer

This is one of my favorite appetizers ever - and they're not all that difficult to make! Once I made these during a cooking demonstration, and the whole group loved them. They taste a little bit like Merkt's cheese spread...did you eat that as a kid like we did in our family?

These are perfect for a Halloween party, or any occasion in the fall. Yum!

Get the recipe here: Pumpkin Patch Cheese Bites

Pumpkin Patch Cheese Bites - Appetizer

Read more...

Buffalo Chicken Mini-Meatballs

>> Wednesday, October 21, 2015


Buffalo Chicken Mini-Meatballs


There's a restaurant chain in New York City called The Meatball Shop and they specialize in -- you guessed it -- meatballs. They grind their own meat and they can even name the farms that sourced each of their ingredients. And yes, they have all the fun they can have on this side of tasteful with the word "balls". 

One of their best-sellers is Buffalo Chicken Meatballs, which was a revelation to both of us. Just when we thought the Buffalo Wings phenomenon had gone as far as it could, here is something new. Bonus: it's a lot healthier than wings fried with their skin on. 

These nuggets make great party appetizers or a mid-week dinner, like the one Joe and I enjoyed last week after we found a great sale on ground chicken. 

Adjust the amount of hot sauce to your own temperament - and you can always add cayenne pepper if you need an extra kick. This version of the recipe is a compromise between Angela's wimpiness and Joe's immunity to spicy foods.

Ingredients

Hungry Lovers Hot Wing Sauce

1/3 cup butter 
3 cloves garlic – crushed 
1 tsp cornstarch in 1 tsp cold water
1 cup Louisiana hot pepper sauce 
1/2 tsp sugar 
2 tsp Worcestershire sauce 
½ tsp fresh ground black pepper 


Directions

Heat a medium sauce pan on medium low heat, and then add in the butter melting it until bubbling stops. Add the crushed garlic and sauté for about a minute. Whisk in the cornstarch mixed with cold water until it is smooth.

Pour the Louisiana hot sauce into the pan, and mix well. Stir in the remaining ingredients. Bring to a slight boil and then reduce the heat to a simmer for about 10 – 15 minutes to blend all the flavors and thicken the sauce.

If making hot wings or chicken tenders, drizzle enough sauce onto the meat to coat, then toss and serve. Otherwise let the sauce cool and store in a jar in the refrigerator. You can also can the sauce. Canning instructions can be found at Hungry Lovers Canning Basics.

For the meatballs

2/3 cup Hungry Lovers Hot Wing Sauce, divided
1 lb ground chicken
1 large egg
1/4 cup onion, minced
1/4 cup celery, minced
3/4 cup bread crumbs
1 teaspoon salt

Directions

Preheat the oven to 450°F. Spray a cookie sheet or baking dish with oil.

Stir together half of the hot sauce and all other ingredients until well mixed. With your hands, scoop up enough meat mixture to make a 1" meatball (about the size of a walnut). Roll into a firm ball. Place the meatballs on the baking pan in rows, keeping the meatballs close together.

Bake the meatballs for 20 minutes, or until they are browned and cooked through. Toss them with the remaining hot sauce before serving. We like these with a variety of fresh crisp vegetables and blue cheese or Green Goddess dressing for dipping.

Makes 30-40 1" meatballs.

Read more...

Cheesy Sweet Pea Spread with Bacon Dust

>> Tuesday, September 8, 2015


Cheesy Sweet Pea Spread with Bacon Dust


We made this crostini spread for our big Labor Day family BBQ in Iowa and it was a hit! Out in Clear Lake and Ventura IA, they take their holidays seriously (Clear Lake's fourth of July celebration makes many lists of  "-- Things to do Before You Die").

Summer in Iowa. Peaceful.


We spent part of the weekend at a picnic in an old maple grove next to Joe's family's cattle ranch. The rest of the time we boated around Clear Lake and watched the weekend sailboat Regatta. What a wonderful way to relax!


Regatta, Clear Lake IA


We tried a first version of this pea spread before making some tweaks. It's wonderfully different with the sweetness of the green peas and the garlic/parmesan combination. If you're fortunate enough to have fresh green peas - say, if you grow them yourself - it will be even better!

Ingredients

4 slices of bacon, cooked crisp
1 loaf baguette bread
2 tbsp oil

For the crostini spread
10-ounce package frozen peas, thawed
1/2 cup ricotta
1 cup grated parmesan cheese
1 stalk green onion
2 garlic cloves, minced
1 tbsp chopped basil
Salt and pepper to taste

Instructions

Preheat oven to 375 degrees. Slice the baguette into 1/2 inch thick rounds and place on a baking sheet. Brush oil on the crostini slices, then bake 15 minutes, or until slightly crisp. Finely chop the bacon slices.

In a blender or food processor, process the sweet pea crostini spread until smooth. Spread onto the bread slices, then top with a sprinkle of bacon crumbs.

We liked this best at room temperature. We made it a day ahead of time since we were traveling to Iowa, and it tasted better the second day.

Serves 10 as an appetizer.

Read more...

Grilled Pineapple with Basil-Tarragon Cream

>> Tuesday, June 16, 2015


Grilled Pineapple with Basil-Tarragon Cream


When you grill pineapple slices, their juices sizzle into caramel and they're richer, smokier. Pair it up with this bright and creamy sauce, and you have breakfast, a side dish, dessert, or all three, if you make enough. This also makes a tasty dip for a spread of fresh-cut fruits.

Basil-Tarragon Cream


By the way, I think people should use tarragon more often. I'm on a quest to bring it back into common use. It has a slight flowery licorice flavor, but if you don't like licorice, I'll emphasize that it's a slight hint of licorice or anise. Tarragon is popular in traditional French cooking. We used to grow a tarragon bush at our house, but now that we're apartment-dwellers there just isn't room. The dried leaves are fine, though a bit milder and mellower. Try using in in salad dressings or with poultry and fish, too.

Ingredients

1 cup plain fat free yogurt
1 tsp fresh tarragon, snipped
3 tsp fresh basil leaves, snipped
1 tsp lemon zest
1 tsp honey
1 large pineapple

Directions

About 1 hour before serving, stir together the yogurt, tarragon, basil, lemon zest, and honey. Allow to sit at room temperature until ready to serve.

Cut off the top and bottom of the pineapple, then cut off all the outside skin. Cut out any of the "eyes" of pith in the fruit. Cut out each section of fruit from top to bottom around the core (think of making a hexagonal stop-sign shape). Cut each section into 1-inch thick slices.


Heat the grill to medium-hot. Lay the slices on the grill, or place them on a grill pan and set it on the grill. Cook for 4-6 minutes on each side, or until the surface is turning golden brown and the fruit is heated through. Serve with a scoop of cream sauce on top.

If you have any leftovers, store the fruit and cream separately, so that the sauce doesn't get runny.

Makes 1 cup of sauce and about 30 slices of pineapple.

Read more...

Light & Spicy Black Bean Dip

>> Monday, May 18, 2015


Light & Spicy Black Bean Dip
It doesn't get more healthy and guilt-free than this quick black bean dip!

We've whipped up this quick dip for parties and a protein-filled side to tuck into our lunches with fresh vegetables. This one suits everyone - weight watchers, vegans, gluten-free friends, and paleo diet-lovers. If you know someone who's sensitive to spicy foods, use tomatoes with bell peppers instead, and leave some good Mexican hot sauce on the side for others.

If you're like us, May and June are filled with graduation parties, early summer get-togethers with friends, and a big craving for something fresh and light to pack for lunch. This dip freezes well in small containers, so you can make a big batch and whip out a bowl when the mood hits you.

Ingredients

1 31-oz can black beans, rinsed and drained well
10 oz can of chopped tomatoes with chiles or bell peppers, well drained
2/3 cup fat-free sour cream, soy yogurt, or cashew cream
1/3 tsp salt
1/2 cup chopped cilantro
2 tsp fresh lime juice
2 tbsp chopped green onions, divided

For dippers:
Carrots, peeled jicama straws, cauliflower, broccoli, cherry tomatoes, celery, snap peas, green onion stalks, bell pepper slices, tortilla chips, pretzel chips (my new love!) and toasted pita wedges.

Instructions

Blend together all ingredients until as smooth and chunky as you like, reserving 1 tbsp green onions. Serve sprinkled with remaining onions and a platter of things to dip in the bean mixture.

Serves 10-12. 

Read more...

Dill Pickle Roasted Chickpeas

>> Wednesday, April 22, 2015


Dill Pickle Roasted Chickpeas


Everybody's all about roasted chickpeas lately, but my sister Beth, who is the Queen of Dill Pickles, had an idea for pickle-flavored roasted chickpeas. How could that be wrong?

Roasting chickpeas is a little more complicated than the recipes that say pop them in the oven for 45 minutes and they come out crunchy and yummy. The best method seems to be to roast them for half the time period, take them out and let them cool 10 minutes, then roast them the rest of the way. This allows the inside of those little beauties to reach maximum crispiness.

This recipe is great to make after you've just finished a jar of pickles. Don't throw away the brine - marinate the chickpeas, then roast them up.

Ingredients

1 28-oz can cooked chickpeas, drained and rinsed
1 1/4 cups pickle brine
1/4 cup white vinegar
1 clove garlic, minced
1 tbsp sea salt
1 tsp dill
Pepper to taste

Instructions

Preheat the oven to 375 degrees. Spray a cookie sheet with oil.

Place the chickpeas in a saucepan and add the brine, vinegar, and garlic. Bring to a boil, then turn off heat and let the garbanzos soak for at least 15 minutes. The longer you marinate them, the more flavorful they'll be after roasting. Alternatively, you can put the beans and dill pickle brine in a jar and soak them in the refrigerator, then drain them and roast.

Drain the beans thoroughly. Spread onto the cookie sheet and roast for 10 minutes. Stir and turn the sheet. Roast for 10 more minutes, then remove from the oven and let cool 10 minutes. Sprinkle with salt, pepper, and dill, and roast 15 more minutes, or until crunchy and slightly browned.

Allow to cool before sealing in an airtight bag or jar.

Makes about 3 cups.

Read more...
Related Posts Plugin for WordPress, Blogger...

  © Blogger template Simple n' Sweet by Ourblogtemplates.com 2009

Back to TOP