Orange-Glazed Asian Chicken (or Ahi Tuna) Wraps

>> Friday, January 31, 2014


Honey-Orange Glazed Chicken Wraps


We recently hosted a "roll your own" sushi party, and ended up with a vast amount of little bits of leftovers, including avocados, ahi tuna slices, wasabi mayo, and napa cabbage. I marinated some chicken in honey and orange juice, then threw together these yummy chicken wraps for a quick dinner. Joe preferred to marinate the ahi tuna then sear it rare with more sesame seeds for his wrap.

I'm pretty sure avocado is one of the most luscious foods on earth. At my party, I was talking to a friend who trains for triathlons, and she said she eats eggs and avocados nearly every day. Delicious, right?

Then I started thinking about all the calories and fat content in those foods. I thought, well, there's your problem. If you didn't eat eggs and avocados every day, you wouldn't have to do all that running and swimming and biking. I didn't mention it out loud, though, because no one really likes unsolicited advice.

However, you can add as much avocado as you like to this wrap, since the napa cabbage cancels out the fat content. This is one of the quickest wraps I've made - you can prepare the mayo and glaze anytime, start your meat marinating in the morning, then quickly cook it up and get dinner on the table in 15-20 minutes. This is a fantastic lunch sandwich, too.

Ingredients

For the glaze

2/3 cup orange juice
1 tbsp honey
1 tsp sesame oil
1 tsp cornstarch

For the wraps

1 tbsp oil
2 chicken breasts, thinly sliced
1/3 cup mayonnaise
2 tsp wasabi paste or powder
8 large flour tortillas
2 avocados, peeled and thinly sliced
2 cups napa cabbage, shredded
1 large carrot, shredded
1 orange, peeled and thinly sliced
2 green onions, chopped
1 tbsp sesame seeds


Instructions


Whisk together the orange glaze ingredients, then pour over the chicken. Allow it to marinate in the refrigerator at least 30 minutes, but ideally several hours. 

Heat the oil in a skillet over medium heat, and cook the chicken and glaze until the chicken is just cooked through and the sauce is sticky. Place in a bowl.

Whisk together the wasabi and mayonnaise. Heat the tortillas on each side in a dry griddle. Wrap them in a clean kitchen towel or tortilla keeper to keep them warm.

Assemble the wraps by spreading the wasabi mayo on each tortilla. Place the chicken, avocado, oranges, carrots, cabbage, and green onions down the center of the tortilla.  Sprinkle with sesame seeds. Fold in the bottom corner, then roll up the sides.

Makes 8 large wraps.

Read more...

Mango-Tangerine Sorbet

>> Wednesday, January 22, 2014


Mango-Tangerine Sorbet
Thanks to Joyosity for this photo, because we ate all our sorbet before I photographed it!

This has to be one of the easiest desserts I've ever made, and when I served it to a party of food epicureans, they just raved over it and wanted the recipe immediately. You know how you're always begging people to take home some leftover dessert so that it won't be around to tempt you for the next week? Didn't even happen this time. I tried to portion out the leftovers equally because they clamored for it.

I know it may seem weird to make a frozen dessert in the wintertime, but I made this for a party where I was teaching friends how to make sushi, and the fruit combo seemed the perfect fit. I'm definitely making it more this summer; it's mostly frozen fruit with mixed with a bit of syrup and coconut milk.

By the way, I'm not taking a stand on the low-fat/original coconut milk health debate, so use what you like. When mangoes are in season in your area, replace the canned mangoes with five fresh peeled and seeded ones, and 1/3 cup of sugar dissolved in 1 cup of boiling water.

P.S. I think this would make a delicious smoothie, too.

Ingredients

3 14-oz cans sliced mango in light syrup
4 ripe tangerines, peeled and seeded
1/3 cup lime juice (3-4 limes)
2 tsp lime zest
1 tbsp fresh ginger, finely grated
1 tbsp ground coriander seeds
1 14-oz can coconut milk

Instructions

Grate the peel of the limes until you have enough zest before juicing them.

Place all ingredients in a blender or food processor and blend till completely smooth (do this in 2 batches if your appliance is not large enough). Pour into a 9x12 pan and place in the freezer. After 90 minutes, stir the puree well to break up any large ice crystals that may be forming. It is ready to eat as soon as it is completely frozen, about 3-4 hours.

Allow to defrost for at least 15 minutes before serving. Ours had been frozen for more than 24 hours, so it took about 35 minutes before it was soft enough to scoop.

Serves 8-10.

Read more...

Potato and Kale Enchiladas

>> Sunday, January 19, 2014


Potato-Kale enchilada filling


My friend Rebecca Stahr is a talented artist in pen and ink, pencil, photography, watercolor, encaustic, and oils. She has an attic studio to die for: filled with thousands of colors and artworks and brushes, and quirky art inspiration like a deer's skull wearing a Mardi Gras hat, mounds of rusty found objects and milkweed pods, and blowtorches and fire extinguishers for flaming encaustic wax resin.


This fall and winter she's been focusing on developing her art business (Rebecca J. Stahr, artist), gallery shows at the College of Lake County and Highland Park's Art Center, and exploring the nature of art and creation in her sketchbook blog


She's also working to develop an "Artists' Tribe", a group of artists who mentor and encourage each other in the sometimes lonely and insecure process of developing art that is authentic to their personal vision.

.h


That's a lot to accomplish all at once, especially in the art world where the competition is so fierce! So she asked me, food lover and cooking fanatic, to prepare some meals for her family so they don't starve and eat healthy while she and her husband both manage high-pressure vocations.


Oh, there's a catch, though - a big challenge for me. Her family is vegan and gluten free due to multiple food allergies, and there's a lot they can't eat. As for me, the more meat the better, and I do love my breads and pastas and all the other gluten-laden foods that are probably aggravating my rhuematoid arthritis. But how could I pass up a chance to learn entirely new ways of cooking? The creative side of my mind was spinning with the excitement of experimenting with food in a way that's completely new to me.

Here, then, is one of the first meals I made for her. The potato and kale make a lovely and filling enchilada, and the sauce punches up the flavor so I don't miss a bit of the meat I usually put in the rolls. I admit, though, that the batch I made for my dinner had a sprinkle of cheese on top. Just a little. But if you're vegan and don't like vegan cheese, you probably won't even crave that.


Potato and Kale Enchiladas

This recipe was inspired by the cookbook Veganomicon.


Ingredients


For the Sauce:

2 tbsp oil
2/3 cup onion, diced
2/3 cup red bell pepper, chopped
1 tbsp chili powder
2 tsp ground cumin
1 tsp oregano 
1 28-oz can diced tomatoes
1 tsp salt

For the Filling:

1 lb. red-skinned potatoes
1/2 pound kale, washed, trimmed, and chopped
3 tbsp oil
4 cloves garlic, minced
1/3 cup cilantro, chopped
1/4 cup vegetable broth or water
3 tablespoons lime juice
1/2 cup toasted pepitas, chopped coarsely
2 tsp salt, or to taste

12-14 corn tortillas

Chopped tomatoes, lettuce, and cheese (optional)


Instructions

In a large saucepan, saute the pepper and onion in oil until tender. Stir in the rest of the sauce ingredients. Using an immersion blender or a food processor, puree the sauce. Bring to a boil in the pan, reduce heat, cover and simmer for 30 minutes.

Cut the potatoes into 1-inch cubes and boil them until nearly tender, about 15-20 minutes. Drain and set aside.In a large skillet, heat the oil, then saute the garlic for 1 minute on medium heat. Add the kale and saute 5 minutes or until wilted, stirring constantly. Stir in the potatoes, pepitas, lime juice, and salt.  Cover and cook 3 minutes. Mash the potatoes slightly with the back of a spoon.

Preheat the oven to 350 degrees. Grease a 9x12 casserole pan, then spread out 1/2 cup of sauce in the bottom of the pan. On a flat griddle or frying pan, heat the corn tortillas until soft and pliable.

Pour half of the enchilada sauce onto a plate, and lay a tortilla on the plate. Spoon 1/3 cup of potato mixture onto the tortilla. Roll up the tortilla and place, seam side down, in the casserole pan. Repeat with the remaining tortillas, then drizzle with the remaining sauce.

Cover the pan with foil and bake at 350 degrees for 20-30 minutes, until the centers are cooked and the casserole is heated through. Top with tomato and lettuce before serving.

Serves 4-6.

Read more...

Arugula Pesto Pizza with Prosciutto

>> Wednesday, January 15, 2014


Arugula Pesto Pizza with Prosciutto


I thought I had tried every possible permutation of pesto, until my friend made me pesto with arugula leaves instead of herbs. She then used it as the sauce of a pizza and she just went on breaking all the recipe norms until I just had to sit back in her garden chair, sip some home-brewed beer, and trust that it would all come together.

Oh, it truly did come together. Talea puts together fabulous food creations, and her husband Larry is the founder of Zumbier, a local brewery in Waukegan.


Well, I didn't spend all my time watching the butterflies and petting her dear labrador Luna. I also spent some time napping on her hammock while she read in the sun. Oh summer, I miss you.


This pizza has enough bold flavor from peppery arugula and luscious prosciutto to satisfy you when winter is seeping into your bones, but is fresh and bright like a summer day. Or maybe I just think like that because I first ate it on a bright summer day in my friend's garden, watching the butterflies flutter over the flowers and soaking in the sun.

Pizza and beer at the Blooms


I would really like to soak up some sun right now. With a slice of pesto pizza and creamy fresh mozzarella, please.

Ingredients


For the Arugula Pesto

3 garlic cloves
2 cups arugula leaves, de-stemmed and chopped
1/2 cup olive oil
1/3 cup sunflower seeds
1/4 cup Parmesan cheese
Salt and pepper to taste

For the Pizza Dough

1 envelope (2 1/2 tsp) active dry yeast
1/2 cup warm water (110 to 120 degrees)
1/2 tsp sugar
2 1/2 cups flour, plus a little more for kneading
1 tsp salt
4 tbsp olive oil, divided
1/2 cup cold water
2 tbsp coarse cornmeal

For the Toppings

1/4 lb thinly sliced prosciutto
6 oz. fresh mozzarella, diced or thinly sliced
1/3 cup red bell pepper, thinly sliced
2 tbsp sliced green olives
1 tbsp capers
1 1/2 tbsp basil leaves, chopped
1 tbsp olive oil

Pesto pizza with Italian Ham

Instructions

Pour the yeast into a small bowl, and slowly add the warm water, stirring constantly. Stir in the sugar. Allow the yeast to work into small bubbles for about 5 minutes. Stir in the oil.

In a large mixing bowl, stir together half the flour and salt. Make a hollow in the center of the flour and pour in the yeast mixture. Stir until well mixed. Stir in the cold water. Gradually add the rest of the flour while stirring constantly, until the dough forms a ball.

Sprinkle a flat surface with flour, and put flour on your hands. Knead the dough on the surface until smooth and elastic and no longer sticky, about 15 minutes. Form the dough into a ball and place in a large greased bowl. Turn the dough over and cover it with a damp kitchen towel. Allow it to rise in a warm place until the dough has doubled, about 1 1/2 to 2 hours.

Place the pesto ingredients into a blender or food processor and pulse until smooth, scraping down the sides often. Set aside.

Punch down the dough and place it on the floured surface. Knead it for several minutes until elastic again.  Roll it out into a circle of about 1/4 inch thickness. Grease a round pan and sprinkle it with the cornmeal. Place the dough in the pan and cover it with the kitchen towel. Allow it to rise for 30 more minutes.

Preheat the oven to 400 degrees.

Spread the pesto on the dough to within 1/2" of the edge of the crust. Arrange the mozzarella and peppers on the dough. Place the prosciutto over the crust, then sprinkle with the olives, capers, and basil. Drizzle the remaining olive oil over the top.

Bake for 20-30 minutes, until the crust is crisp and the pizza is cooked through.

Serves 4-6.

Read more...

Tostones: Garlic Fried Plantains

>> Sunday, January 12, 2014


Tostones: Garlic Fried Plantains


Fried plantains are one of the most common side dishes you'll find in Puerto Rico and some other Caribbean Islands. Tostones are made with unripe green plantains, rather than the yellowish-black ripe ones that are sweet and have a peach-colored flesh.

Unripe green plantains


This means that they're as starchy and firm as a potato and are used in many dishes like we'd use potatoes. The green ones don't taste like bananas at all. They're so firm that tostones are usually fried twice, which gives Joe and me an extra slap of cholesterol to the heart.

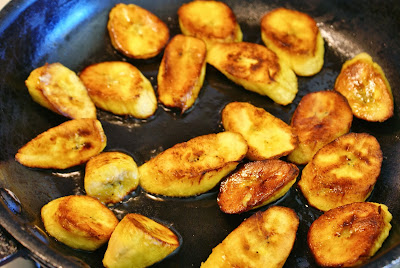
Instead of cooking these the traditional way, we boil them first in a garlicky broth and then fry them and mash them flat in a skillet. Add some fried garlic chips for extra flavor, and they're wonderful.

Frying plantains for tostones


We lived for a couple days with friendly couple in San Juan, Marialana and Luis, who have a gorgeous penthouse with a rooftop terrace overlooking Condado Beach. Tropical birds dash in and out of the night-blooming jasmine vines that enclose the rails on the roof. Lovely.


The rooftop terrace in San Juan

We happened to be there for the festival of La Noche de San Juan Bautista, or Saint John’s Night, on June 23-24, so we walked down to the beach where an enormous (family-friendly) party was in progress. At midnight, we all walked backwards into the ocean, and dipped back into the water three times. It is said to bring the festival-goers good luck and free us of our sins. I certainly felt wonderful after a midnight dip in the Caribbean!

Festival of La Noche de San Juan Bautista, Puerto Rico
We're waiting for midnight at Condado Beach, San Juan

All along the coastline we could see campfires on the beaches and people singing and lighting fireworks into the sky. The ocean was warm as bathwater and the whole world seemed to be dancing on the beach. It was a beautiful night and we all went to bed sandy and smelling of the sea.

Marialana taught us this recipe, but there's really nothing to it. If you're tired of other starchy side dishes, try our lower-fat version of this Boricuan specialty.

Plaintain harvester walking down the road
Plaintain harvester, with a seriously sharp machete.

Ingredients

1/3 cup oil
5 garlic cloves
3 large green plantains
Salt and pepper to taste

Instructions

Peel two cloves of garlic and slice them thinly. Place 2 tbsp of oil and the garlic slices in a large cold frying pan. Heat the pan on medium until the garlic starts to sizzle; cook for a few minutes until the garlic is golden on both sides but not brown. Brown or black garlic is very bitter, and starting with a cold frying pan will allow you to crisp up the garlic slowly.

Remove the garlic to paper towels and let it drain.

Cut the peels off the plantains and cut them into 1" thick coins. Place them in a medium saucepan and cover them with water. Add salt and pepper to taste, then mince the rest of the garlic and add it to the pot. Bring the pot to a boil, reduce heat, and simmer until the plantains are almost tender.

You can also cook the plantains in the garlic water in a bowl in the microwave, if you prefer. We were in a hurry so we did it this way last time.

Soaking plantains for tostones


Drain the plantains. Add the rest of the oil to the large skillet and heat the oil until it shimmers. Add the plantains and begin frying them and pressing them with the spatula. Add salt and pepper to taste. They should be flattened and a nice crispy brown on all sides when done.

Put the tostones on a serving plate and sprinkle with the garlic chips before serving. Some people like to eat these with Caribbean banana ketchup. I promise you it is worth a taste!

Serves 4 as a side dish.

Read more...

White Bean Chicken Chili

>> Sunday, January 5, 2014


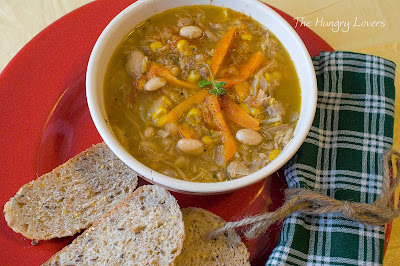
White Bean Chicken Chili


Oh my, it's cold here in Illinois. It's two little degrees in Chicago, and they're saying that tomorrow will be about -10 F. I know there are much colder places in the world, but this shivers my timbers.

Time for a hot bowl of thick and spicy white bean chili. Chili in general is just about as flexible as a martini - you can add pretty much anything and still call it what it is. So if you don't have any white beans, throw in kidney beans or cannelinis or pintos - whatever you like. We like an extra bite of spice, so scale it back if spicy is hard on you.

This chili is great for using leftover cooked chicken or turkey, browned ground chicken, or even canned chicken if you're in a hurry. If you're not in a hurry, throw it all in a crockpot and go snowshoeing or ice fishing or some other winter-loving sport. Or you know, just cluster around the heating vents until it gets warmer.


Ingredients

2 tbsp oil
1/2 tsp red pepper flakes
1 ancho pepper, seeded and chopped
3 cloves garlic
2/3 cup diced onion
1/2 cup bell pepper, chopped
1 14-oz can white beans, drained
1 cup frozen corn kernels
4 cups chicken stock
1 pound chicken or turkey
1 tablespoon ground cumin
1 tablespoon dried oregano
Salt and pepper to taste

Toppings

1/2 cup cilantro leaves, chopped (optional)
2/3 cup shredded colby-jack cheese (optional)


Instructions

If you're using raw meat, cut it into bite-size pieces and saute with 1 tbsp of oil in a large saucepan. Set aside. Heat the 2 tbsp of oil and add the red pepper flakes and ancho pepper. Cook on low heat until the ancho is flexible. Add the onion, garlic, and bell pepper and cook until translucent.

Stir in the remaining ingredients except toppings and bring to a boil. Reduce heat to a low simmer, cover, and cook for 1 hour. Taste and correct the seasonings. Serve topped with the cilantro and cheese if you like. We ate this with a big loaf of cheesy pull-apart garlic bread. I'm embarrassed to say that we ate the entire loaf, but it is so very delicious, and we're fighting heavy weather here, folks.

Cheesy pull-apart garlic bread


If I had any sweet green chilies, cornbread with chilies would have been my preference. Chili and corn bread are like peanut butter and jelly, right?

Cornbread with sweet green chillies


The White Bean Chicken Chili serves 4-6.

Read more...

Miso Cucumber Salad

>> Thursday, January 2, 2014


Miso Cucumber Salad

Ingredients

1 large cucumber, peeled and thinly sliced
2/3 cup Carrot, peeled and cut into matchstick slices
1/2 cup Onion, peeled, cut in half, and very thinly sliced
1/2 cup sliced bamboo shoots, drained
1/2 cup Daikon radish, peeled and sliced into paper-thin coins (you can substitute red radishes, if you prefer, but don't peel them!)
1/2 cup Sugar snap peas, bias-cut into 1/2-inch slices
1/3 cup light miso paste
2 tsp sesame oil
1/3 cup rice vinegar
1/2 tsp sugar

Instructions

Whisk together the miso, oil, vinegar, and sugar. Arrange the vegetables decoratively on four plates, then drizzle with the miso dressing. Allow to marinate for 20 minutes at room temperature before serving.

Serves 4.

Read more...
Related Posts Plugin for WordPress, Blogger...

  © Blogger template Simple n' Sweet by Ourblogtemplates.com 2009

Back to TOP