Our Favorite Champagne Cocktails

>> Sunday, December 30, 2012


Champagne Cocktails

Champagne and sparkling wine has always been my favorite kind of wine - the drier the better. The little bubbles are like a party in a glass! Luckily, there are plenty of delicious sparkling wines in the $5-$10 range, and plenty of ways to dress up the wine if you want a special drink to ring in the New Year.

The best champagne cocktail I ever had was on a Paris riverboat cruise on the Seine, where the scenery slid by at dusk and lights came on all over the city. People picnicking on the sides of the river waved to us and the music on board seemed to swell just as the waiter brought me a flute glass of Kir Royale. Magical. 

Angela Williams Duea with Kir Royale on Paris riverboat cruise

Mimosas/Bellinis/Kir Royales

These champagne cocktails, popular for brunches, are made by pouring champagne over fruit juices or liqueurs in a champagne glass. If you pour carefully, the juices mix in the glass without popping the bubbles, and of course you want bubbles!

Mimosa: 3 oz of orange juice in 3 oz Champagne; garnish with an orange twist.
Bellini: 2 oz peach nectar, 1 tsp Grenadine, and 4 oz Champagne; garnish with a lemon twist.
Kir Royale: 1 oz creme de cassis (black currant liqueur) in 5 oz Champagne; garnish with a cherry.
C and C: 2 oz Chambord (raspberry liqueur) in 4 oz Champagne; garnish with a lemon twist.
  

 Classic Champagne Cocktail

1 sugar cube
3 drops Angostura bitters
6 oz champagne

Put the sugar cube in the bottom of the glass and drop the bitters onto it. Fill the glass with champagne. Don't stir - allow the sugar cube to melt as you drink it.

Black Velvet

4 oz. Guiness or other stout beer
4 oz Champagne

Pour the stout into a highball or Collins glass. Slowly pour the champagne over the beer, then serve.

Barbotage

1 oz cognac
1 oz Grand Marnier (orange liqueur)
4 oz Champagne

Stir together the Cognac and Grand Marnier, then pour into a flute glass. Slowly add the champagne. Caution: this is a powerful cocktail. We're not responsible for who you kiss at midnight!

Champagne Julep

6 mint leaves (we like peppermint for this one)
1 tsp superfine sugar
2 oz bourbon
4 oz Champagne

Put the leaves in a bowl or mixing glass and sprinkle with the sugar and a few drops of water. Crush the mint leaves well (this is called "muddling"). Stir the bourbon into the mint, then strain into a highball or Collins glass. Add ice cubes and champagne, and garnish with a mint leaf.

P.S. Ever wonder about the difference between Champagne and sparkling wines? Any wine could be carbonated, but Champagnes must be made in a specific way in the Champagne region of France to be labelled "Champagne". We think they're delightful either way.


Read more...

Apple Butter Lattice Coffee Cake

>> Friday, December 28, 2012


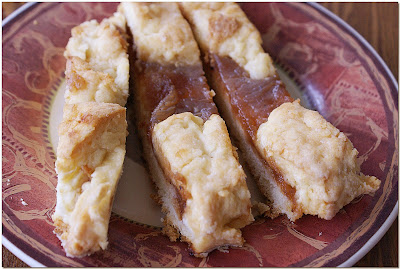
Apple Butter Lattice Coffee Cake


I think this is the time of the year when cinnamon and apples and pastry fresh out of the oven tastes especially good. We made this lattice coffee cake with apple butter I canned this summer, and it was perfect for Christmas brunch. It's easy enough to make for any breakfast when you've got the time to sit down together and enjoy the morning.

The inspiration for this pastry came from Farm Bell Recipes, which is a fun site full of delicious cooking ideas.

Ingredients


2 cups flour
1 1/2 tbsp baking powder
1/2 tsp cream of tartar
1 tsp salt
1 tablespoon sugar
3 ounces cream cheese, softened
1/2 stick butter (4 tbsp)
3/4 cup milk
1 1/2 cups apple butter (we're partial to our Crock Pot Apple Butter recipe)

Powdered Sugar Frosting

1/3 cup powdered sugar
2 tbsp vanilla
2 tbsp milk

Directions

Stir together dry ingredients. With a pastry cutter or fork, cut in cream cheese and butter until crumbly and beginning to stick together. Stir in the milk. With your hands, knead the dough. It will be a little dry, but if it is too dry to stick together, add a little more milk.

Spreading apple butter on pastry


Preheat the oven to 375 degrees. Roll out the dough on a floured surface, and shape into a 12x8 rectangle. Place in a greased cookie sheet. Spread the apple butter down the middle of the dough, leaving at least 2 inches on the long sides and a 1 inch margin on the short sides.

Make diagonal


Criss-cross cut strips of dough over the top and pinch ends to seal. Bake in a 375-degree oven for 25 minutes or till nicely browned on top.

Stir together powdered sugar and vanilla, then gradually add milk until the frosting is liquidy enough to drizzle. Using a fork, dribble the frosting back and forth across the warm bread.

Makes 1 loaf.

Read more...

Shiner Holiday Cheer Beer

>> Friday, December 21, 2012


Shiner Holiday Cheer, from the Spoetzl Brewery in Texas, is called an "Old World Dunkelweizen" ale. Not sure what that means for average beer drinkers? This means that the Holiday Cheer beer is medium brown wheat beer with a thick creamy head. It's malty, which means it has a smooth coffee-like taste with less bitterness than some dark beers.

Lots of breweries make a Christmas brew with spices like nutmeg, cinnamon, or cloves, and Dunkelweizen beers usually have notes of banana and cloves. But Shiner Holiday Cheer went in a traditionally Southern direction with Texas peaches and roasted pecans. All of this together means a dark, satisfying wheat ale with interesting fresh fruit notes and a nutty finish.

Another reason to like Shiner Holiday Cheer? The hip retro-50s plaid and snowflake bottle and carton design. You don't even need a glass, the bottle is already decorated for Christmas!

Read more...

Pork Tamales

>> Wednesday, December 19, 2012


Pork Tamales


Tamales are one of the first holiday foods created in the Americas. Ancient Incas, Mayans and Aztecs had their own versions of meats, spices, herbs, seeds, and beans wrapped in corn dough and steamed in banana leaves or corn husks. There are over 40 types of tamales made in Latin America; some are only made on special occasions, while others are everyday staple foods.

When I lived with a Mexican family, they usually made these pork tamales (and sweet pink ones with red raisins) for Christmas dinner. Wrapping these bundles takes a bit of skill and time, but all the women would crowd into a kitchen, turn up the music, and laugh and talk their way through a pile of these goodies.

Memories like these are the best parts of a holiday tradition, don't you think? Even though tamales take time, the work seems like nothing when you're doing it with people you love.

Unwrapping a steaming hot, delicately crumbling tamal filled with smoky pepper-simmered pork is like opening a little Christmas present. These are fantastic with the mild pepper sauce and a dab of sour cream.

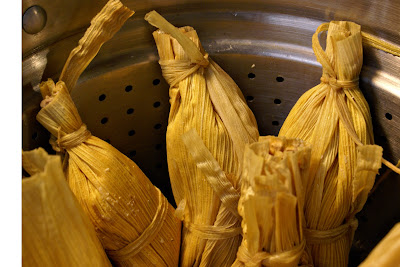
Tamales Steaming
Did you know? One bundle is called a tamal; the plural is tamales.

By the way, you can make the filling and dough days ahead of time and then wrap them up whenever you're ready. Get the whole family involved and it might become one of your family traditions, too!

Ingredients

50 corn husks, about 8 inches long with no rips or gaps; in specialty stores, these are sometimes labeled hojas de milpa.

Filling

1 lb boneless pork, cut into cubes
4 cloves garlic, smashed
1 tbsp ground black pepper
2 tsp sea salt
4 ancho chiles
2 tsp flour
2 tsp oil
4 cloves garlic, minced
1 tsp oregano
1 tsp ground cumin

Tamale Dough (Masa Harina Dough)

Note: you can often find tubs or bundles of pre-made Masa dough in the refrigerated cases at the grocery store. Read the label for the ingredients; many brands use only water and corn processed with lime. If it does, be sure to beat each cup of dough with salt and 1/3 cup of shortening to reach the proper consistency.

4 cups corn flour (masa harina)
1 tablespoon salt
2 tsp baking powder
1 1/3 cups solid vegetable shortening (or lard, if you prefer)
4 cups reserved broth from cooking the pork (or more, if the dough is too dry)

Directions

Soak the corn husks for several hours; it helps if you weight them down with something so they are completely submerged and get pliable.

In a medium pot, cover the pork, pepper, salt, and garlic with 4 cups of water. Bring to a boil, cover, and simmer for 45 minutes to one hour, until very tender. Allow to cool, then skim off the fat and drain the pork. Reserve the cooking broth and add additional water to equal 5 cups of liquid.

Seed the chiles and tear them into pieces. Place them into the blender or food processor with 1 cup of the pork broth, heated to boiling. Let soften 15 minutes then puree the chiles.

Heat the oil in a large saucepan. Brown the flour in the oil, then stir in the garlic, oregano, and cumin. Pour in the chile mixture and one more cup of the pork broth and whisk until smooth and thickened.

Sauce for Pork Tamales

Reserve half the sauce in a separate covered container. Shred the pork into the remaining mixture, and allow to simmer on low heat for 20 minutes.

Drain the corn husks and towel off the water. If you have any raggedy-looking ones, peel them lengthwise into strips to tie up the tamales. You can also use kitchen string, which is a little easier to use, in my opinion!

Fill a large steaming pot with enough water to cover the bottom, but not touch the steaming basket. We use our pasta pot to steam tamales. We also add a clean penny to the bottom of the pan. As long as the water is boiling in the pot, we hear the penny rattling and know there's enough water for steaming. Place one or two corn husks on the bottom of the steamer basket.

Masa harina dough

In a large mixing bowl, stir together the masa harina, salt, and baking powder. Beat in 4 cups of pork broth until you have a moist batter. Add the shortening and beat until the dough is fluffy and thick. A traditional way to test if your dough is the right consistency is to float a little ball in a glass of cold water. If it sinks, it needs more beating, and shortening. If it dissolves, it needs more flour and shortening. If it floats, it's just right.

Open up one corn husk with the narrow end toward your wrist. Spread about 1 tablespoon of the dough over half the husk, leaving a generous margin on each side. Arrange 1 tablespoon of pork filling down the center of the dough, then bring up the long sides of the husk and fold one over the other. Be sure the dough completely encircles the filling.

Rolling a tamal

Fold up the pointed end of the husk so that it's even with the top of the leaf, then tie it in the middle or towards the top.

Stand up the tamales in the steamer basket, and top with another two corn husks. Cover with a tight lid and bring to a boil. Don't open the steamer unless you need to add more water. Steam the tamales for 1 hour, then take one out and try to open it. The tamales are done when they separate easily from the husks.

Serve the tamales hot with the reserved chile sauce and sour cream.

If you have leftovers, they freeze really well in their husks and you can heat them up in the microwave or re-steam them.

Makes 30-40 tamales.

Read more...

German Potato Pancakes (Kartoffelpuffer)

>> Monday, December 17, 2012


German Potato Pancakes
Thanks to Lori Stalteri for taking this photo for me.

I have to be honest with you: I don't like some of the traditional German potato pancakes. My grandma (God rest her merry soul) and many before her made them with raw grated potatoes that somehow turned a little gray and gooey in the middle. It just wasn't appetizing or flavorful enough for me.

But I have tasted superb ones in German restaurants like the Brauhaus in Chicago and Mader's Restaurant in Milwaukee, and a cute little local place called The Swedish Cafe. If I like fried potatoes, onions, sour cream and applesauce, surely there must be a way to combine this in a way I enjoy.

Every Christmas, we have a tradition of meeting my daughter and her boyfriend in Daley Plaza for Chicago's Christkindlmarket, and we always share a big plate of pancakes with sour cream and applesauce on the side, and mugs of beer and mulled wine. After our annual trip last week, I was craving them again.

Joe experimented until he came up with the most marvelous potato pancakes I've ever tasted. His trick is to cook the potatoes slightly before draining and frying, and he added the traditional German flavorings of lemon, caraway, and onion to the basic recipe. Next summer, we're going to try these with fresh zucchini, too.


These are filling enough for a whole meal, which is what I ate for dinner that night, along with a bowl of organic applesauce I canned this summer. Joe, being a meat and potatoes man, added some leftover pork carnitas to his pancake plate.

Ingredients

2 lbs (about 6 cups) shredded russet potatoes (we shredded them with the skin on for more fiber & flavor)
1 medium yellow onion, peeled and minced
2 tbsp lemon juice
1/4 cup flour
1 tsp ground caraway seed
2 tbsp chopped fresh parsley
1 tsp ground pepper
2 tsp salt
2 eggs or 1/2 cup egg substitute
1/4 cup vegetable oil (for frying)

Directions

After shredding the potatoes, put them in a colander and rinse them until the water runs clear, to remove some of the white or pinkish starch that will prevent them from crisping. Place potatoes in a large saucepan and cover with water. Bring it to a boil, cover, and simmer 5-10 minutes, until slightly tender. Drain the potatoes in a colander and allow them to cool.

Place 1/4 of the potatoes into a clean, absorbent dish towel, roll up the towel, and wring out all of the excess water into the sink (this ensures the pancakes will not be gummy or doughy). Place the dried potatoes into a large mixing bowl and repeat with the remainder of the potatoes.

Stir in all the rest of the ingredients, except the oil. Heat a large frying pan, then add 1/2 of the oil and spread it around the pan. Scoop out 1/4 cupfuls of the potato mixture and place it in the pan. Use a spatula to press it into a pancake shape. Cook each pancake for 2-3 minutes on each side, until golden brown and cooked through. Use more oil as the pan becomes dry.

As the pancakes are cooked, place them in a single layer on paper towels and keep them on a warm platter in the oven until they're all done.

Makes about 25 1/4-cup pancakes.

Read more...

Beef Tenderloin with Horseradish Blue Cheese Sauce

>> Friday, December 14, 2012


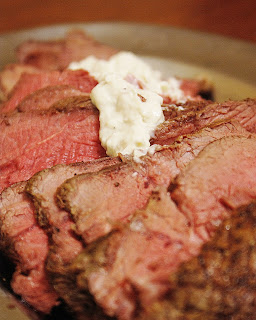
Beef Roast with Horseradish Blue Cheese Sauce


This roast is good enough for Christmas dinner or a special dinner party. A buttery-smooth tenderloin or lean sirloin roast is best, but the low-fat and flavorful horseradish sauce will dress up any beef roast. I personally could just eat the sauce with a spoon, but I'm crazy about blue cheese in general. Maybe I should just say that the roast is optional. Go for the sauce!

The original recipe came from Weight Watchers, so you know it's a guilt-free and scrumptious meal.

Ingredients

2-3 pound beef tenderloin or sirloin roast
2 tbsp oil
1/2 tsp freshly ground pepper
1/4 cup fat-free mayonnaise
1/4 cup fat-free sour cream
2 tbsp prepared horseradish
1 tsp sweet paprika
1/4 cup blue cheese, crumbled
1 tbsp Worcestershire sauce
1 tbsp lemon juice

Directions

Heat oil in a frying pan. Sprinkle the meat with salt and pepper, then brown it on all sides. Heat the oven to 275 degrees and roast the meat until it reaches 130 degrees on a meat thermometer (60 to 90 minutes, depending on the weight). Remove it from the oven, cover it with foil, and allow it to sit for 5 minutes before carving.

While the meat is roasting, stir together the rest of the ingredients and allow it to chill until ready to serve. We like to warm up the blue cheese sauce before passing it with the meat.

Serves 6-8 4-oz servings. If you follow Weight Watchers, these are 8 points per serving with 2 tbsp sauce.


Read more...

Vegan Polenta Bites with Salsa

>> Wednesday, December 12, 2012


I came up with these vegan gluten-free appetizers when I realized my gluten-sensitive friend and a vegetarian friend would not have anything to eat at a chocolate party I was planning. We pressed warm polenta into a mini muffin pan and pressed a dent into the top. Before we baked them, we spooned a little salsa into those hollows.

Joe and I are longtime polenta lovers, so these cute little bites with our homemade poblano-thyme salsa were just our thing. People raved about these appetizers and even chose them over equally yummy fat-, meat-, and flour-laden treats.

This is another one of those recipes we love because they are quick, and can be made up to a week in advance, chilled, then cooked right before the party. There's always so much to do before a party that it's a blessing to have some of it out of the way ahead of time. If you want an even easier route to a gluten free polenta bite, buy the prepared polenta in a tube or plastic package, from the refrigerated section of the grocery store.

Ingredients

3 1/4 cups vegetable broth or water
2 tsp chili powder
1 cup coarse cornmeal (Bob's Red Mill is great!)
1 cup poblano-thyme salsa, or commercially prepared salsa
1/2 cup crumbled farmer's cheese or queso fresco (if making a non-vegan version)

Directions

In a large saucepan, bring the vegetable broth or water to a boil with the chili powder. Stirring constantly, add the polenta. Reduce the heat and simmer 45 minutes, stirring frequently, until the polenta is creamy and very thick. It should coat a wooden spoon thickly when it is done.


Spoon the polenta into oiled mini muffin tins. Make sure you press the polenta firmly into the pan so that the bites don't crumble when you remove them. You know how cornmeal gets. Press your thumb or a spoon into the center of each muffin bite to make a shallow dent.

Chill at least an hour, or up to 1 week. Set 1 tsp of salsa into the dent of each bite. Bake at 375 degrees for 20-30 minutes, until the polenta is crispy and browned around the edges. Allow to cool slightly before serving. Sprinkle with cheese, if desired.

Makes 24 appetizers.

Read more...

Salted Caramel Dreamboats and Turtles

>> Sunday, December 9, 2012


When I worked with my Grandma in her cake and candy-decorating store, every once in a while she'd tell me stories about her childhood and her courtship with my Grandpa Jim. They met during World War II when he was visiting a friend in the hospital in California, and fell in love there. They weren't very demonstrative about their love, but sometimes in the middle of twirling a perfect frosting rose onto a slip of waxed paper, she'd stop her ever-busy hands and look off into space.

"He was a dreamboat," she said. "He looked just like Errol Flynn. And his moustache...!"

Then she'd shake away the thought with a smile, and go on making roses for someone's wedding cake. I remember her hands were always soft from working with frosting and chocolate, and her bakery always smelled like a child's dream of heaven.

Grandma used this candy recipe to make both pretzel dreamboats and chocolate turtles. She gave us extra turtles every year because she knew that they were my Mom's favorite candy. I adore them both.

To make turtles, replace each pretzel with two whole cashews or pecans. Make sure the chocolate drips all the way to the nuts so that the piece holds together. You can skip the sea salt if you wish.

Ingredients

1 pkg milk or dark chocolate chips
30 little pretzel twists or squares (60 whole pecans or cashews)
2/3 pound block caramel, or 30 firm caramel cubes (like Brachs)
1 tbsp coarsely ground sea salt

Directions

Melt the chocolate slowly in a double boiler or microwave until smooth and very runny.

Place the pretzels on a cookie sheet lined with foil.

Using clean kitchen shears or scissors, cut 1" square pieces of caramel and press them into button shapes with your fingers. Press onto the top of the pretzels or nuts.

Swirl 1 tsp of chocolate on top, allowing some to drip down over the caramel and pretzels or nuts. Sprinkle a little sea salt over the chocolate before it hardens.

Allow to cool for at least 30 minutes before boxing or wrapping the candies and refrigerating them.

Makes 30 candies.

Read more...

Gourmet Chocolate-Dipped Pretzel Rods

>> Saturday, December 8, 2012


These candied pretzel rods are so easy to make and look so fancy that people will think you spent all day making them. There's something amazingly satisfying about the chocolate/salt/crunch combo that makes these irresistable. Joe brought a platter of these to his worship band Christmas Party last night, and they ate 'em up lightning-quick.

When I make these for a party, I make half pretzel rods. Somehow, an entire rod of chocolate and candy is too big of a commitment on your plate of appetizers, but a half-sized one hardly has any calories, right? Since they're so rich, a small portion seems just right. If you give these as gifts, a nice box of long decorated ones look elegant.

My favorite combo is white chocolate with chopped pecans and mini dark chocolate chips. Let me know which ones you like best!

Ingredients

1 package pretzel rods
12 oz milk chocolate chips
12 oz cup white chocolate chips

Toppings

Candy sprinkles
Colored sugar
Mini dark chocolate chips
Crushed toffee
Mini M&M candies
Flaked coconut
Chopped nuts
Chopped dried fruits (raisins, cranberries, banana chips)

Directions

Melt the chips slowly in separate double boilers, a bowl over a pot of hot water, or in the microwave (be careful not to scorch the chocolate!). Break the pretzel rods in half, if desired.

Dip the rod into the chocolate at least 2/3 of the way up the rod. I try to leave at least 1 inch of uncoated pretzel at the top. Use a spoon to coat the pretzel if the bowl is too short to let you dip the whole thing in. Holding the uncoated end, allow the excess chocolate to drain off.

Now it's time to decorate the rod! After you've dipped it, set it on a cookie sheet covered with foil. Sprinkle it with any amount of toppings you like. To add a drizzle of the opposite-colored chocolate, run a fork through it and then drizzle back and forth across the pretzel. It helps if you do this part quickly. Don't stress if the drizzles doesn't look like what you've seen master chefs do on TV. From my own drizzling experience, those little stripes look professional to other people. We're just too hard on ourselves!

If the chocolate starts to get too thick or lumpy, return it to the heat and stir until it gets smooth again. Be careful not to get any water into the chocolate, or it will get crumbly and unusable.

Makes 20-30 rods, depending on package size.

Read more...

Dreamy Chocolate Truffles

>> Friday, December 7, 2012


I'll bet you will surprised when you find out how easy it is to make these luscious and dreamy truffles. Like the gourmet black mushrooms that gave these candies their name, homemade truffles are a little lumpy and rustic-looking on the outside, but full of heavenly flavor.

I have about 20 variations that I learned from my grandmother, Therese Tarr, who once owned a wedding cake business and a candy store in Waukegan, IL. She sent us boxes of assorted candies every Christmas.

I learned most everything I know about sweets from working in her store, and then later visiting her in Minnesota so she could pass down her tips to my daughters. I like to think that maybe she's looking over my shoulder when I use her candy molds and recipes. I hope you love these as much as we do.

P.S. When you roll out these truffles by hand, expect to get messy. And roll them small, because they are unbelieveably decadent and rich!

Chocolate chips for Dreamy Chocolate Truffles

Ingredients

16 oz semisweet chocolate morsels
3/4 cup heavy cream, or evaporated milk
1 tbsp vanilla

 Directions

Heat the cream until just boiling (bubbles around rim of saucepan). Remove from heat. Slowly pour the chocolate morsels into the cream, stirring constantly, until creamy and somewhat like the consistency of whipping cream. If adding other ingredients, stir them into the chocolate.

Melting chocolate for truffles
My daughter Jessie stirs so fast her spoon is a blur.
Refrigerate the bowl for one hour, or until firm enough to form balls with your hands. Remove from fridge and scoop out 1/2 tsp at a time if you're dipping them in chocolate or rolling them in a thick topping; otherwise, roll them 1 tsp at a time. With your hands, form them into balls and place them on a cookie sheet in the refrigerator. If you are not dipping the truffles into chocolate, roll them in nuts, cocoa powder, dry coffee creamer, or top with colored sugar, flakes of sea salt, or other sprinkles.

If you plan to dip the truffles in chocolate, cool the balls in the fridge for at least 30 minutes, or until hard. Melt white, milk, or dark chocolate, or almond bark, in a double boiler. Using a spoon or candy dipper, dip each ball quickly into the chocolate, and then allow the expcess to drip off before returning it to the sheet. Decorate each ball right after you have dipped it, so that the topping sticks to the truffle. Refrigerate 30 minutes before serving or packaging.

Variations

Raspberry/Chocolate Truffles

8 oz semisweet chocolate morsels
8 oz white chocolate morsels
3/4 cup heavy cream, or evaporated milk
1 tbsp vanilla
1/2 tsp raspberry flavoring
Red food coloring (optional)

Follow directions as above, adding sufficient food coloring to make the truffles dark red. Dip in dark chocolate and decorate the top of the truffle with a red swirl of chocolate piping.

Cappucino Truffles

8 oz semisweet chocolate morsels
8 oz milk chocolate morsels
1/2 cup instant coffee crystals
3/4 cup heavy cream, or evaporated milk
1 tbsp vanilla

Follow directions as above. Dip in milk chocolate and sprinkle with powdered cocoa.

Cherry Walnut Truffles

1/2 cup maraschino cherries, drained
1/2 cup walnuts
8 oz semisweet chocolate morsels
8 oz milk chocolate morsels
3/4 cup heavy cream, or evaporated milk
1 tbsp vanilla

Roll cherries on absorbent paper towels to completely dry them. Finely chop the cherries and walnuts together. Follow directions as above, adding the cherries and walnuts towards the end. Dip in dark or white chocolate and sprinkle with finely chopped walnuts.

Chocolate Mint Truffles

8 oz semisweet chocolate morsels
8 oz white chocolate morsels
3/4 cup heavy cream, or evaporated milk
1/8 tsp peppermint flavoring

Follow directions as above. Dip in dark chocolate and decorate the top of the truffle with a green swirl of chocolate piping, or green sugar sprinkles.

Almond Joy Truffles

16 oz white chocolate morsels
3/4 cup heavy cream, or evaporated milk
1/4 tsp almond flavoring
1/3 cup chopped almonds
1/4 cup shredded coconut


Follow directions as above. Stir in the coconut and almonds before the mixture becomes too stiff. Dip in dark chocolate or roll in cocoa powder, and decorate the top of the truffle with a sprinkle of coconut.

Grand Marnier Truffles

8 oz semisweet chocolate morsels
8 oz milk chocolate morsels
1/4 cup Grand Marnier
2/3 cup heavy cream, or evaporated milk
4 drops orange flavoring

Follow directions as above. Dip in dark chocolate and sprinkle with powdered cocoa or decorate the top of the truffle with a swirl of white chocolate piping.

Read more...

Roasted Red Pepper Bruschetta

>> Wednesday, December 5, 2012


Whenever we're having company over, or plan to bring an appetizer to a party, Angela's first choice is Joe's roasted red pepper with pine nuts and raisins. It's an interesting combination of smoky, sweet, and buttery flavors perfect for toasted bread rounds. We also love it as a topping for hearty crackers like Triscuits, rye crisps, or toasted pita wedges.

The original appetizer is from the legendary Rao's Italian restaurant in New York City, where Joe spent many of his younger days.


Ingredients

6 red bell peppers
1 clove garlic, minced
3 tbsp golden raisins
3 tbsp pine nuts
1 tbsp Italian parsley, chopped
salt and pepper to taste
1 loaf of baguette, French, or other thin crusty bread
Butter-flavored cooking spray, or olive oil

Directions

Heat the broiler or grill. Place the peppers on a broiler pan or cookie sheet. Broil or grill close to the heat until the exposed side is blotchy, black, and peeling. Turn over the peppers and roast until both sides are blistered and the skin is blackened.


Place the peppers in a paper bag and allow to steam for 30 minutes. This will help you peel the blacked parts off. When finished steaming, cut off the stem and scrape the charred skin and seeds off with a knife. Cut the peppers into thin strips and let drain in a colander for 1 hour.

Stir together all ingredients (except the bread) and allow to marinate at room temperature for at least an hour.

Cut the bread into 1/2 inch thick rounds. Spray them with cooking spray or brush with olive oil. Toast in the oven until slightly browned but still soft.

To serve, top the bread rounds with about 1 tbsp of pepper mixture, or serve in a bowl with crackers or bread on the side.

Makes about 2 cups.

Read more...

Cranberry-Pomegranate Cosmopolitans

>> Friday, November 30, 2012


Cranberry-Pomegranate Cosmopolitans

Cosmos are the ultimate girlfriend drink. Sweet, fruity, with a touch of vodka, shaken and poured into an elegant cocktail glass, we ladies look cosmopolitan just holding one. That's why I'm serving this cocktail next week when I invite my girlfriends over for a chocolate candy party. We're going to make truffles, chocolate-covered pretzel rods, and chocolate cashew turtles while sipping these holiday drinks.

Don't worry, I'll be sharing all the party recipes with you. Bottoms up!

Ingredients

1 cup unsweetened cranberry-pomegranate juice
1/2 cup vodka
1/2 cup Cointreau, Grand Marnier, or Triple Sec
2 tablespoons lime juice
4 ice cubes
4 orange peel twists for garnishes

Directions

Pour all the ingredients except orange peels into a large cocktail shaker. Shake briskly, then strain into four cocktail glasses. Rub the orange peel around the rim of the glass, then twist it and drop it into the glass.

Makes 4 4-oz. cocktails.

Read more...

Julia Child's French Onion Soup (Soupe à l’Oignon Gratinée)

>> Wednesday, November 28, 2012


Julia Child's French Onion Soup (Soupe à l’Oignon Gratinée)


Angela has been wanting to write this post for a long time. Part of this desire is to share one of her most favorite foods, French onion soup, and re-promote it so that it will become trendy again and she can order it whenever she wants in a restaurant. Because if a restaurant does offer it, she is likely to turn down other promising foods to order soup instead.

This recipe is so much more wonderful than what you usually get in a restaurant or a can. While we have made a few alterations to suit our own tastes, the stock is unbelievably flavorful, rich and onion-y but not harsh, bitter, salty, thin, and grainy like its inferior cousins. The long slow simmering time is what gives this soup its richness. Julia offers several upgrades to the basic recipe, like poaching an egg in cognac under the slice of crusty bread and fine cheese, and if you want to change your life forever, you will try them all at least once.

Simmering French Onion Soup


We found her classic book, "Mastering the Art of French Cooking," years ago in an antique shop in Iowa. Joe always wanted a basic French cookbook and had a deep respect for Julia. Angela only knew Julia from the "Saturday Night Live" skit where Dan Ackroyd, playing Julia, gets drunk on cooking wine and cuts off his hand during a cooking show. Neither of us pay much attention to popular movies, so we were startled that Julia Child has become a household name again due to the successful movie "Julie and Julia".

Every Julia Child recipe should start out with the directions, "Take out all your pans and a pound of butter." So it is with this recipe. Make a large batch so you won't resent the dishes you will wash later.

Ingredients

6 cups thinly sliced yellow or Vidalia onions, divided in half
3 tbsp butter, divided in half
2 tbsp canola oil, divided in half
1 tsp salt, divided in half
1/2 tsp sugar, divided in half
3 tbsp flour
2 quarts boiling-hot beef broth
1/2 cup dry white wine or vermouth
1 loaf of crusty French bread
1 clove of garlic
1 tbsp olive oil
2 cups grated Gruyère or Swiss cheese

For Soup Gratineed with Cheese (Soupe à l’Oignon Gratinée)

2 oz. Swiss cheese, cut into slivers
1 tbsp grated raw onion
1 tbsp olive oil

For Onion Soup Gratineed de Luxe (Soupe Gratinée de Trois Gormandes)

1 tsp cornstarch
1 egg yolk
1 tsp Worcestershire sauce
3 tbsp Cognac

Directions

Melt half the oil and butter together in a large soup pot. Add half of the sliced onions, cover the pan, and cook them for fifteen minutes. Remove the lid, raise the temperature to medium, and stir in half the salt and sugar. Brown on all sides slowly for 30 to 40 minutes, until the onions are evenly browned and caramelized.

Sprinkle on the flour and stir for 3 minutes. Slowly pour in the boiling broth, stirring constantly. Next, stir in the wine or vermouth, and salt and pepper to taste. Simmer for 30 minutes, covered.

In a frying pan, melt the other half of the butter and oil, and brown the second half of the onions in the same way. Add to the soup and simmer for 15 more minutes. This is where we diverge from Julia's recipe. Cooking two batches of onions will ensure a better texture for the soup, as the first batch of onions will now be rather soft and pureed.

Cut the bread into 1-inch thick rounds. Rub with the garlic clove, then saute in the olive oil.

To serve, place the bread rounds in the bottom of a soup bowl, and ladle the soup over it. Sprinkle cheese over the top.

For Soup Gratineed with Cheese (Soupe à l’Oignon Gratinée)

Preheat the oven to 325 degrees.

Prepare the soup as above and pour into an oven-safe bowl. Before serving, stir the Swiss cheese slivers into the soup. Top with the sauteed bread rounds, then the grated onion, then the grated cheese. Drizzle with the olive oil.

Place the bowl in the oven and bake for 20 minutes. Set under the broiler for a few minutes, until the top is slightly browned. Serve immediately into separate bowls.

For Onion Soup Gratineed de Luxe (Soupe Gratinée de Trois Gormandes)

After completing the Soup Gratineed with Cheese steps, beat the cornstarch into the egg yolk, then the Worcestershire sauce and the cognac. Lift up the bread crust and remove a ladleful of soup. Slowly beat it into the egg yolk mixture.

Lift up the crust again and pour the mixture on top of the soup, then stir it gently into the soup.

Serves 6-8. 

Read more...

Low-Fat Cheese Enchiladas

>> Sunday, November 25, 2012


The week after a holiday, we're always feeling the urge to scale back our cooking and eat a bit lighter. What we love about this low-fat enchilada casserole is that we can throw this together in the morning before work (or the night before), pull it out in the evening, and relax while it bakes. Yum!

Ingredients

2 cups chopped white onion
1 tbsp oil
2 cups fat-free sharp cheddar cheese, shredded and divided
1 1/2 cups fat-free sour cream
2 tbsp fresh cilantro
8 large flour tortillas
1 16 oz can red enchilada sauce (we like La Preferida or Goya brand; you can find this sauce next to the salsas)

2 cups chopped lettuce or cabbage
1 cup chopped tomato

Directions

Cook the onion in the oil until tender. Transfer to a mixing bowl. Add the 1 1/2 cups of cheese, the sour cream, and cilantro and mix well. Spray a casserole dish with oil, then spread 1/2 cup of enchilada sauce over the bottom.

Heat the tortillas in the microwave for 30 seconds, or until flexible. Spoon 1/8 of the cheese mixture in a line down the center of a tortilla, leaving room at all ends. Fold the bottom and top ends up over the mixture. Roll the tortilla up and place in the casserole dish. Repeat with the remaining tortillas. Pour the remaining sauce over the enchiladas.

Preheat oven to 350 degrees. Cover the casserole with a lid or foil and bake for 30 minutes. Remove the foil  and sprinkle with the last 1/2 cup of cheese. Cook for 15-20 minutes more, until the center is hot and bubbly.

Top with the lettuce and tomato before serving. 

Serves 4-6.

Read more...

Murbteig Pie Pastry

>> Wednesday, November 21, 2012


Murbteig Pie Pastry

I have to admit that I've always hated making pie crust. Like other cooking chores, such as handling raw meat, Joe was the one willing to coddle along a pie crust so that it wasn't worked too hard (and became tough), or split and crumbled in all directions.

But then Joe started working tremendous hours in his small business, and my craving for quiches and pastys (if you don't know what this is, the recipe is coming up soon) went unfulfilled. Around that time, I discovered this easy German pastry recipe that makes a flaky, delicate, full-flavored crust. Even better, it will handle just about any amount of rolling and primping and re-forming without getting chewy and hard. It absorbs fruit juices without getting soggy.

I'm smitten. I can't find enough reasons to roll out this dough. I hope you like it, too.

The recipe makes enough pastry dough for a double-crust pie. You can easily cut this recipe in half for a cheesecake, quiche or tart. If you're using this pastry to make a fruit pie, it's traditional to add a few drops of lemon oil or 1/4 tsp lemon zest along with the eggs.

2 1/2 cups sifted all-purpose flour
2 tsp baking powder
1/2 teaspoon salt
1 stick cold butter (do not substitute)
2 large eggs

Stir together the flour, baking powder, and salt in a large mixing bowl. Chop the butter into small pieces and sprinkle it over the top. With a pastry cutter or fork, cut the butter into the dry ingredients until the mixture resembles coarse meal.

Whisk the eggs in a separate bowl, then mix them into the dry ingredients until the mixture forms a smooth pastry. Wrap it in parchment or waxed paper and it let rest at room temperature for 30 minutes, so that it's easier to handle.

Cut the dough in half and roll each half out into a circle, or press it into a pie plate or springform pan with your fingers. Prick the bottom with a fork. Add any filling to the pan before adding the top crust and pinching together the edges.

Read more...

Light Roasted Garlic Mashed Potatoes

>> Monday, November 19, 2012


Light Roasted Garlic Mashed Potatoes


These mashed potatoes are fabulously creamy and flavorful without the heavy load of fat found in some of the traditional recipes - my grandma's mashed potato recipe called for a cup of whole milk and an entire stick of butter! Joe has been making this lighter version for years. Cutting back on calories while enjoying the full flavor makes it easier for me indulge in other holiday treats. Like pecan pie. Mmmmm.

Ingredients

8 cloves garlic
1 tsp oil
8 russet potatoes
2/3 cup fat-free cream
2/3 cup chicken broth
1/4 tsp sage
Salt and Pepper


Directions

Preheat the oven to 400 degrees.

Cut off the tips of the garlic cloves and set them upright in a baking pan. This is easiest if you leave the cloves connected to the root at the bottom of the head of garlic. Drizzle the top with oil and roast until tender and golden, about 20 minutes.

Scrub the potatoes and cut them into small chunks. Place them in a pot and cover with water. Boil the potatoes until they are fork-tender but not too mushy. Drain the potatoes well, then return them to the pot.

Squeeze the skins off the garlic and mince them. Stir them into the pot, along with the cream, chicken broth, salt and pepper. If you're waiting for other parts of your dinner to finish cooking, you can keep this on hold at a low simmer until you're ready to mash the potatoes. We like the smash them with a potato masher, but you can also mash them in an electric mixer.

Makes about 6 cups.

Read more...

Swank Holiday Pumpkin Bars / Pumpkin Cupcakes

>> Sunday, November 18, 2012

Thanks, Dakota Callaway, for taking this picture for me.

These pumpkin squares are a yearly tradition in Jessie's boyfriend's family. Kim Swank was kind enough to give me her recipe, which I think works equally well as bars or cupcakes. I'm a huge fan of cream cheese frosting, and this one is amazingly smooth and creamy.

I plan to pass on the recipe on to my parents this Thanksgiving. Each year, my parents grow dozens of pumpkins on their farm for the grandchildren, and can quarts of pumpkins for the family. They are going to love these cupcakes for the holidays!

Ingredients

Pumpkin Squares

1 cup oil
I 28-oz. can pumpkin
1 1/2 cups sugar
2 cups flour
2 tsp baking powder
1 tsp baking soda
2 tsp cinnamon
4 eggs, beaten

Frosting

3 oz. cream cheese, softened
1 cup butter, softened
2 cups powdered sugar
2 tsp vanilla
1/2 tsp nutmeg
1/2 cup walnuts, chopped


Directions

Preheat oven to 350 degrees.

Mix together all pumpkin squares ingredients. If you are planning to make pumpkin cupcakes, grease the cupcake tins or use paper baking cups. Divide the batter evenly between the cups. Bake at 350 degrees for about 15 minutes, or until a toothpick inserted in the center comes out clean.

If making pumpkin squares, grease a cookie sheet with sides and spread the batter in the cookie sheet. Bake at 350 degrees for 25-30 minutes, or until a toothpick inserted in the center comes out clean.

Let cool.

In an electric mixer, beat together all the frosting ingredients EXCEPT nutmeg and walnuts. The longer you beat it, the creamier it gets. Frost cake or cupcakes. Sprinkle the nutmeg and walnuts over the frosting. Cut into squares before serving.

Makes 12 cupcakes or 24 squares.

Read more...

Pecan Orange Sweet Potato Casserole

>> Friday, November 16, 2012


Pecan Orange Sweet Potato Casserole


Are you ready to start cooking for Thanksgiving? We're looking forward to all those special holiday dishes! For years, we made that traditional candied sweet potato casserole with the miniature marshmallows on top. The kids loved it. But now that we're all grown up, this velvety casserole with a bit of spice and a caramel-ly pecan topping is much more satisfying. It may sound odd to add a dash of cayenne, but wait until you taste the magic that it adds to these sweet potatoes.

Check back here for more Thanksgiving recipes, and at the end of the week, some recipes to use up all those yummy turkey leftovers.

Ingredients

4 cups sweet potatoes, peeled and cubed
1/2 cup orange juice
1/2 cup milk
2 large eggs, beaten
1 tsp vanilla
1 1/2 tsp salt
1 tsp cinnamon
1/2 tsp ground cayenne pepper
1/2 tsp grated orange rind

For the topping:

2/3 cup brown sugar
1 cup Pecans, finely chopped
1/3 cup Flour
6 tbsp butter

Directions


Simmer the sweet potatoes in a saucepan of water, or microwave them in water until they are fork-tender. Drain them thoroughly and mash them in a large bowl (we like them a little lumpy). Stir in all the rest of the ingredients. Pour it into an 8-inch square baking pan.

Preheat oven to 400 degrees.

Mix together the topping ingredients with a fork until it is crumbly and well combined. Sprinkle over the top of the casserole. Bake in a 400-degree oven for 30 minutes, or until golden brown.

Read more...

Make-Ahead Tossed Salad

>> Wednesday, November 14, 2012


It's time to think about Thanksgiving dinner - and until the big day, I'll be writing food posts that you can make for your family! If you're the one tapped to bring a salad, this is an easy bet because you can make it ahead of time.

This classic refrigerator salad recipe has been around forever. It used to be one of my favorites when I was young, and my girls used to request it all the time when they were kids. What I love about it is that you can make the salad days ahead of time and stick it in the refrigerator until you're ready to serve it. The dressing layer holds in the freshness and taste, and the vegetables stay crisp and tasty until it's time to eat. If you don't like any of these vegetables, add what you like.

This old-fashioned tossed salad is perfect for a holiday meal, since you can throw it together ahead of time and save your holiday day for something more fun, like stuffing a turkey or playing Outburst with rowdy family members or chasing toddlers around the house.

Ingredients

3 cups chopped iceberg or romaine lettuce
1 cup grated carrots
2 cups chopped baby spinach
1 cup frozen peas
1/2 cup sliced onions
4 slices of bacon, cooked and crumbled
1 cup sliced mushrooms

Dressing

1 cup mayonnaise
2 tsp lemon juice
1 tsp thyme
1 tsp dill

Topping

1/2 cup shredded cheddar or Swiss cheese
2 green onions, sliced

Directions

Assemble the salad ingredients in a serving bowl, in the order listed. Whisk together the dressing ingredients. Spread the dressing over the top of the mushrooms, making sure the dressing completely covers the mushrooms and seals the salad right up to the edge of the bowl. Sprinkle the topping ingredients over the top.

Cover and refrigerate for up to 4 days. Just before serving, stir the salad until the ingredients are coated with dressing.

Serves 6-8 as side salads.


Read more...

Pork Roast with Sauerkraut, Apples, and Onions

>> Wednesday, November 7, 2012

Pork Roast with Sauerkraut, Apples, and Onions

The German branch of my family came to Chicago in the early 1900s, and settled on the North side of Chicago in the Lincoln Square and West Rogers Park area. This are was heavily populated with German families, and the Hopfner branch of the family had a bakery at 4754 N. Lincoln Avenue where my grandmother worked as a kid.

My grandmother, Therese Detzner Tarr, was part of the first generation born in the U.S. Unfortunately, she came of age as World War II was beginning and anti-German attitudes were rampant. The trend was to assimilate into U.S. culture. I don't have a lot of German recipes, stories, or memories from the family, but one of my favorite meals from Grandma Tarr was pork roast with sauerkraut.

I've updated this recipe in a couple of ways. Joe, not growing up with much sauerkraut on his plate, doesn't like the strong tartness, so I drained and rinsed the kraut before cooking it. Also, I added apples and onions to the pot. It truly becomes autumn on a plate with these extra ingredients.

Ingredients

1 tbsp oil
3 lbs pork roast (any cut will do)
16 oz. sauerkraut
1 1/2 tsp carraway seed
2 cups yellow onion, thickly sliced
2 cups tart apple (Granny Smith, Jonathan, McIntosh), cored and cubed

Directions

Heat the oil in a large saucepan. Brown the meat on all sides.

Drain the sauerkraut and lightly rinse, if desired. Place the kraut in the bottom of a roaster pan, Dutch oven, or large crock pot. Sprinkle with half of the carraway seed. Place the apples and onions on top, then place the roast on top of the apples and onions. Sprinkle with the other half of the seeds. Cover.

Roast in the oven for 1 hour at 350 degrees, or until meat is tender. Add a bit of water if the pot becomes dry. If using a crock pot, cook on low heat for 6-8 hours or until meat is tender.

Serve by placing the fruit and vegetables on a platter, then topping with slices of the roast pork.

 Serves 6-8.

Read more...

Norwegian Poached Salmon

>> Friday, November 2, 2012


Joe, being true to his Norwegian roots, loves salmon and every other type of seafood he's ever tried. I'm a little more picky about strong-tasting seafood. I have heard the saying that you have to try something seven times (or twenty or thirty or whatever) before you develop a taste for it, but even though I tasted bits of Joe's salmon whenever he ordered it, I could never get past the strong fishiness.


When I took a Humanities course in the United Kingdom, I developed a bad ear infection in Inverness, Scotland. Left behind by my classmates, I wandered around the deserted hotel and watched the staff take down holiday decorations.

Marriott hotel, Inverness, Scotland

At lunch, the waiter told me they'd just gotten salmon that was caught the day before in Norway. I decided to try their poached salmon recipe, and really liked it. If you have trouble eating salmon, you might just like it this way, even if your salmon fillet wasn't swimming in the Atlantic a few hours earlier.


Highway in Northern Scotland

That night, our Irish bus driver attempted to heal me by ordering me a hot toddy of Highlands whiskey, hot water, lemon peel, and honey. I felt better until the next morning, when I made an appointment with a local doctor and got a prescription for antibiotics. Their public health system was top-notch. 

The Scots told me this is an authentic Norwegian staple recipe.You can skip the drizzle of melted butter if you're watching your fat intake.

Ingredients

2 tsp fresh dill
1/2 cup sour cream
1 tsp anchovy paste
2 tbsp white wine vinegar
1/2 cup chicken broth or white wine
1 bay leaf
4 4-6 oz. Norwegian salmon fillets
2 tbsp melted butter
salt and pepper to taste

Directions

Whisk together the dill, cream, anchovy paste, broth, and vinegar. Lay the salmon in a large skillet and pour the sauce over the fish. Break the bay leaf in half and lay it in the sauce. Bring the liquid to a gentle boil. Cover the pan, reduce heat, and let it steam for 15 minutes, or until the fish is flaky when poked with a fork. 

Remove the bay leaf. Put the fish and sauce on a serving plate. Drizzle the melted butter over the fillets, and sprinkle with salt and pepper before serving. 

This is really good with Mushroom and Pine Nut Wild Rice Pilaf.

Serves 4.

Read more...

Duck in Green Pumpkin-Seed Sauce (Pipián Verde con Pato)

>> Wednesday, October 31, 2012


This interesting duckling in pumpkin-seed sauce recipe is from central Mexico. It reminds us that pumpkins and other squashes are New World foods, and indigenous people used the pulp and seeds for many different purposes. Nowadays, we mostly think of Jack-O-Lanterns, pumpkin pie, and salted seeds when we think of pumpkins, but the husked seeds are often used in Mexican foods. Another version of the pipián sauce is red, and uses sesame seeds instead of the little hulled pumpkin seeds called pepitas.


Fall is duck-hunting time in Mexico, too. Many species of duck fly to the Southwestern US and into Mexico when the weather gets cold up north. If you're not a hunter, don't have any duck-hunting friends, and you can't find any duckling in the store, any kind of poultry will work well for this recipe. However, the richness of duck breast is especially delicious with the creamy and slightly spicy pumpkin seed sauce.

We turned down the heat in the original recipe from Guanajuato, a state in central Mexico where Angela's ex-mother-in-law lived. Add more serrano peppers if you like.

Ingredients

1 5-lb duck
1 tbsp oil

Pipián sauce

8 medium tomatillos (about the size of a plum)
6 cups chicken or vegetable broth
1 cup hulled raw pumpkin seeds, plus 2 tbsp for topping
1/2 cup white sesame seeds
3 tbsp oil
1/2 cup onion
4 garlic cloves, minced
1/2 cup cilantro, minced
1 tbsp Mexican oregano, minced
2 tsp freshly ground black pepper
3 serrano peppers, seeded and chopped

Directions

Cut the duck into quarters and pierce the skin all over with a fork. Heat oil in a large saucepan. Fry the quarters, skin side down, until nicely browned (do this in batches if the pieces don't brown easily). Don't turn over the pieces; the fatty skin side will get nice and crispy this way. Once the skin side is browned, drain off the rendered fat and put a lid on the pan. Cook the duck for 40 minutes, or until the meat is tender.

Meanwhile, peel the husks off the tomatillos and scrub off the sticky sap. Cut them into quarters and cover them with 3 cups of chicken broth. Bring to a boil, reduce heat, and simmer for 10-15 minutes or until soft. Allow to cool.

Heat 1 tbsp of oil in another pan, and toast the sesame seeds until they are golden brown. Pour the seeds into a blender. Heat the rest of the oil and toast the pumpkin seeds until slightly browned and fragrant. Set aside 2 tbsp for the topping, and place the rest in the blender.

Add the garlic, black pepper, cilantro, oregano, and serrano peppers to the blender. Pour in the tomatillos and the broth used to cook the tomatillos. Blend until smooth.

Heat the last 1 tbsp of oil in a saucepan. Pour in the sauce and warm it on low heat for about five minutes, stirring frequently. Don't let the heat get too high or the sauce will lose its green color. Little by little, add the rest of the broth, stirring frequently. The sauce should become the consistency of thick cream. If you heat it too much and it gets curdly, return the sauce to the blender and blend it until smooth again.

Salt it to your taste, then add the duck pieces, skin side up. Heat for 10 minutes.

Serve by spooning a cup of sauce onto a plate, then placing a duck quarter on top of the sauce, then topping it with a splash of sauce and a sprinkle of pumpkin seeds. This is good with rice; we especially recommend wild rice, grown where the ducks like to nest. You might want to try our Mushroom and Pine Nut Wild Rice Pilaf.

Serves 4-6.

Read more...

Scalloped Potatoes and Ham

>> Friday, October 19, 2012

This is one of my absolutely favorite comfort foods ever. A good ham is proof that God loves us. I usually make this after serving a big ham for a holiday dinner, because there are always all those good bits and pieces left over, and this is so easy to make after a big fancy holiday meal.

If you don't happen to have cooked a big ham lately, you can use any kind of ham, from lunch meat slices to a can of Spam or a ham butt end. Joe recently brought home a butt (snicker) that our local grocery store had deeply reduced in price. After we sliced up a bunch for ham sandwiches, and cut out the bone for soup, I made a big casserole of scalloped potatoes and ham.

By the way, if you don't have any ham, or are on a very tight budget, the potatoes themselves are a filling and yummy meal or side dish on their own.

Ingredients

1 medium yellow onion
1/3 cup chopped yellow pepper 
2 tbsp butter
2 tbsp oil
2 garlic cloves, minced
1/2 cup flour
2 cups fat-free milk, heated
10 medium-sized red-skinned potatoes (I like the smooth, creamy texture of red potatoes for this recipe)
2 cups chicken broth
3 cups chopped ham
Cooking spray
2/3 cup bread crumbs


Directions

Peel and chop the onion. Melt the oil and butter together in a saucepan. Saute the onion and pepper together until tender. Add the garlic. Stir in the flour until it is moistened and sticks to the vegetable pieces. Pour in the hot milk and stir very well until smooth. You might need to whisk the mixture to get any flour lumps out. Allow to simmer.

Scrub the potatoes and cut them into 1/2 inch thick slices. Put them into a pot with the chicken broth and bring it to a boil. Turn down the heat and simmer it until the potato slices are almost tender but still a little hard when you poke them with a fork. 

Drain the potatoes, and pour the cooking broth into the milk mixture. Heat the mixture to a boil and reduce heat and let it simmer about 20 minutes, stirring frequently, or until very thick like pudding or gravy.

Preheat the oven to 350 degrees.

Spray or oil a 9x12" casserole pan. Spread a few spoonfuls of the white sauce in the bottom of the pan. Arrange 1/2 of the potatoes on top, then half of the ham. If you want to get artistic, you can arrange the potato circles in overlapping rows, or "scallops", which is one reason for the name of this recipe.

Pour half of the white sauce over this layer. Add another layer of potatoes and ham, and then pour the rest of the sauce on top. Make sure there is at least 1/2" rim above the food so that it won't boil over in the oven and make a mess. It's OK if you have to discard or freeze some leftover white sauce. There are a million things you can do with it.

Cover the pan with aluminum foil and put it in the oven. Cook for 20 minutes, then remove the foil. Sprinkle the breadcrumbs over the top, then spray them with cooking spray. Cook for 10-20 minutes more, or until the potatoes are tender but not falling completely apart, and the breadcrumbs are nice and browned.

This is great with cooked peas or a fresh green salad.

Serves 6 - 8.

Read more...
Related Posts Plugin for WordPress, Blogger...

  © Blogger template Simple n' Sweet by Ourblogtemplates.com 2009

Back to TOP